eCHS Platform Manual
version 1 (May 2025)
Setting up your account
- After successful creation of an Organization Admin User account by an ECHX admin, the user will receive an email to create a password.
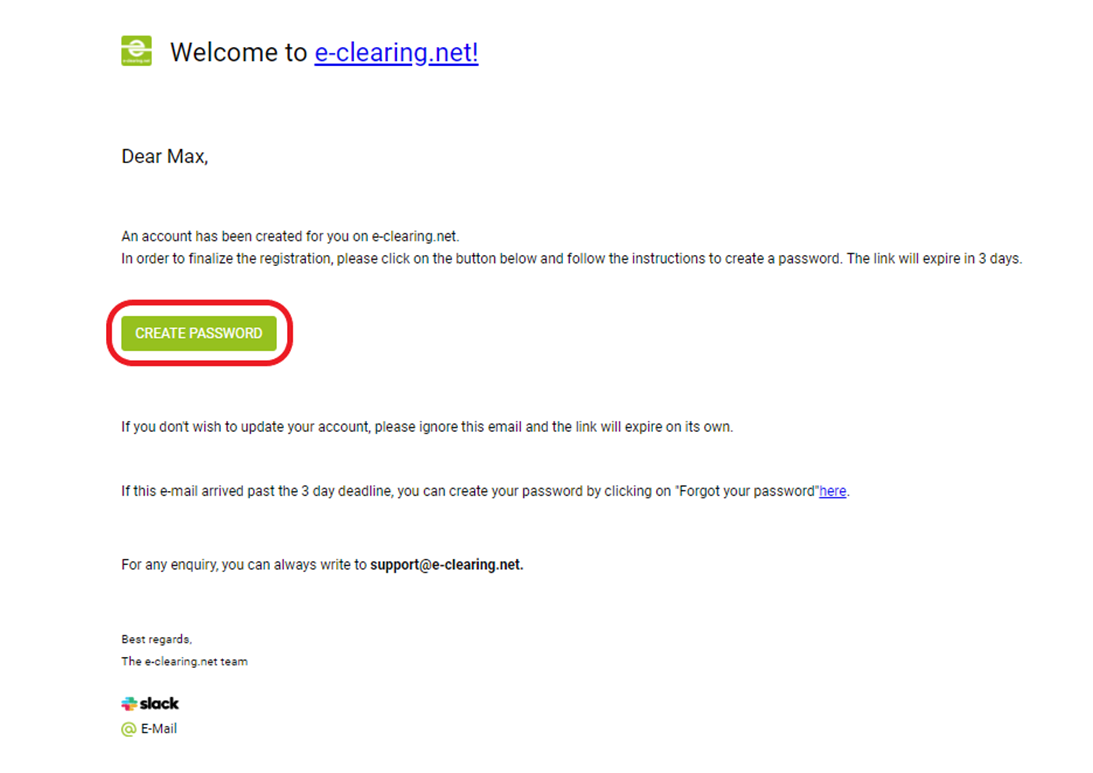
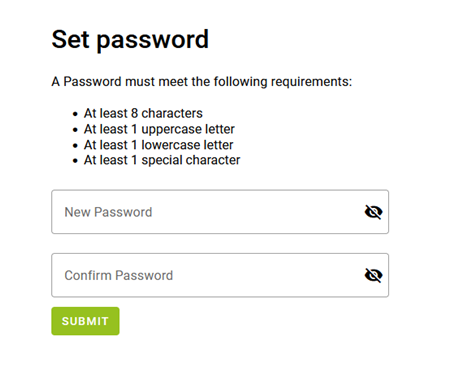
- By clicking on „Create Password “, eCHX website will open and the user will be asked to set a password that meets specific requirements and confirm it.
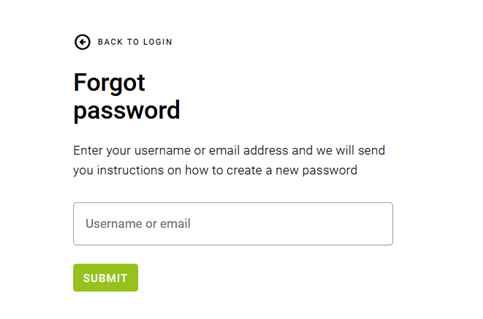
- If users forget their password, they can request a password reset from the login page.
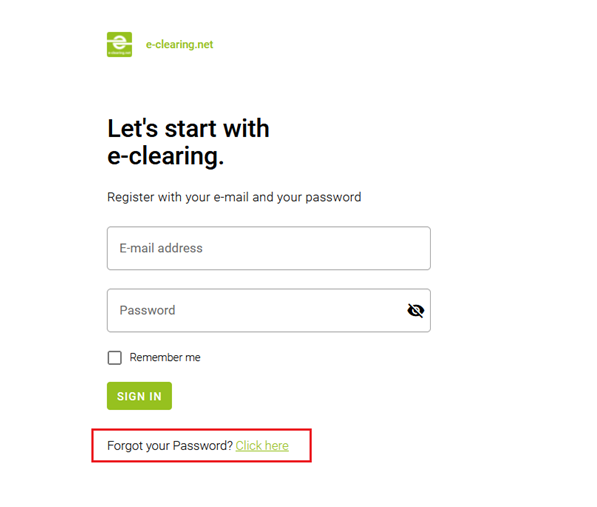
- By clicking on „Click here “, the user is prompted to enter their username or email address, after which they will receive an email to create a new password.
- If you encounter any issues related to receiving the activation email, creation of password or account, you can reach out to us through slack or our support email.
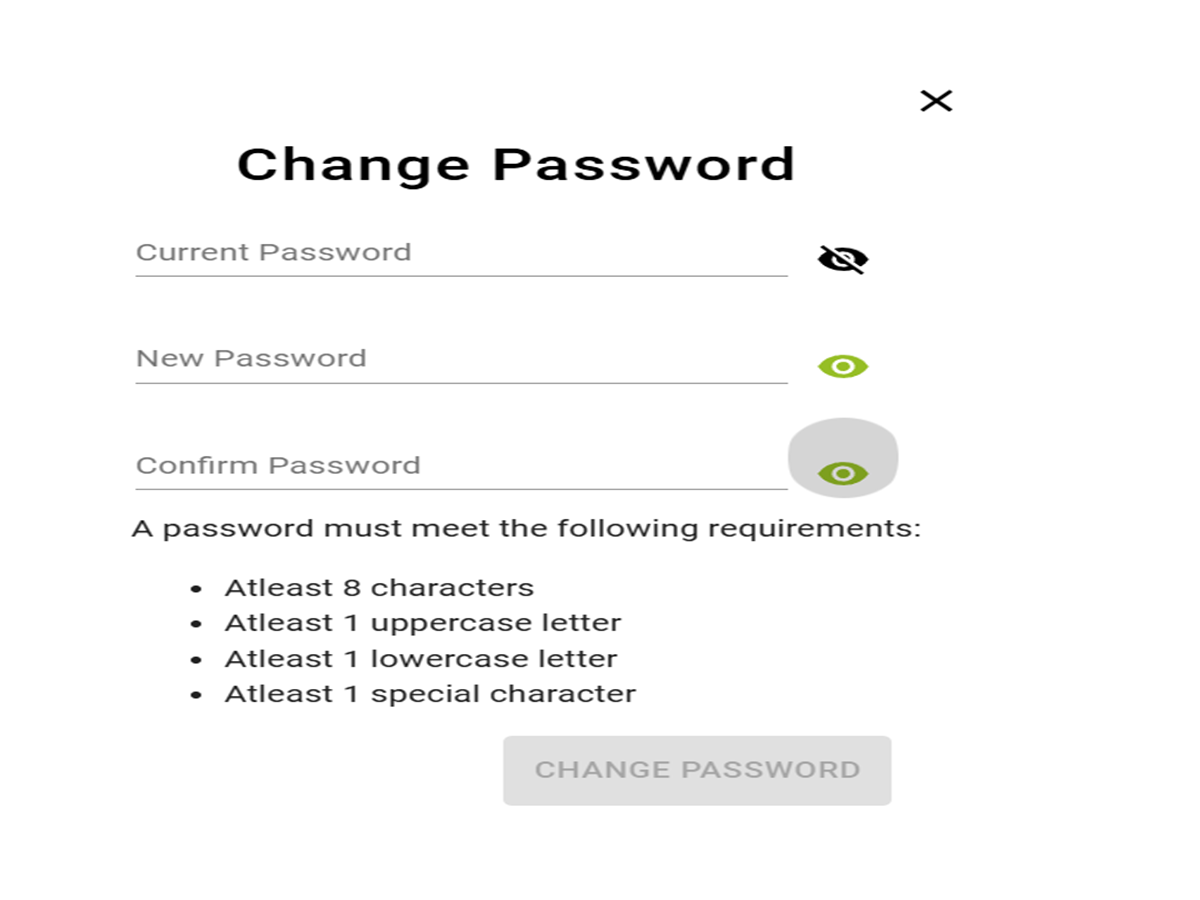
The Change Password window allows the user to securely update their account password. It contains three input fields:
Current Password – where the user enters their existing password.
New Password – where the user types the new password they want to use.
Confirm Password – where the user re-enters the new password for confirmation.
🔒 Passwords are hidden by default, but users can toggle visibility using the eye icon.
To be accepted, the new password must meet the following requirements:
At least 8 characters
At least 1 uppercase letter
At least 1 lowercase letter
At least 1 special character (e.g., !, @, #, $, etc.)
The "Change Password" button remains disabled until all fields are correctly filled and the password meets the listed criteria.
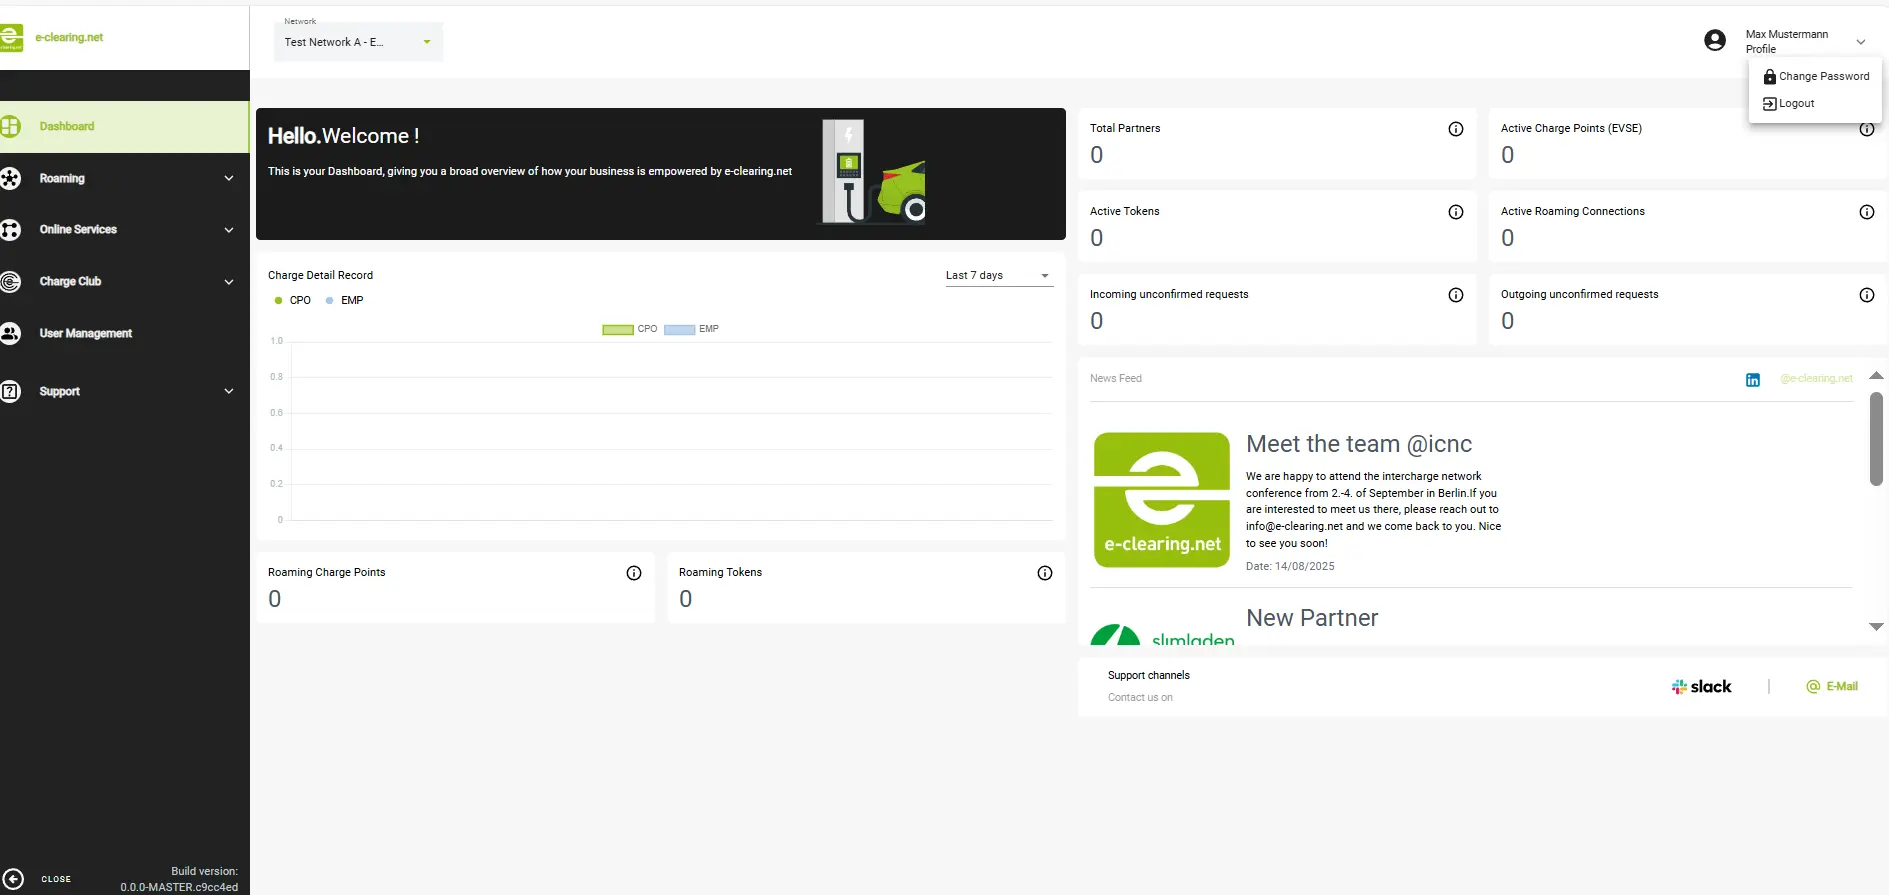
Dashboard
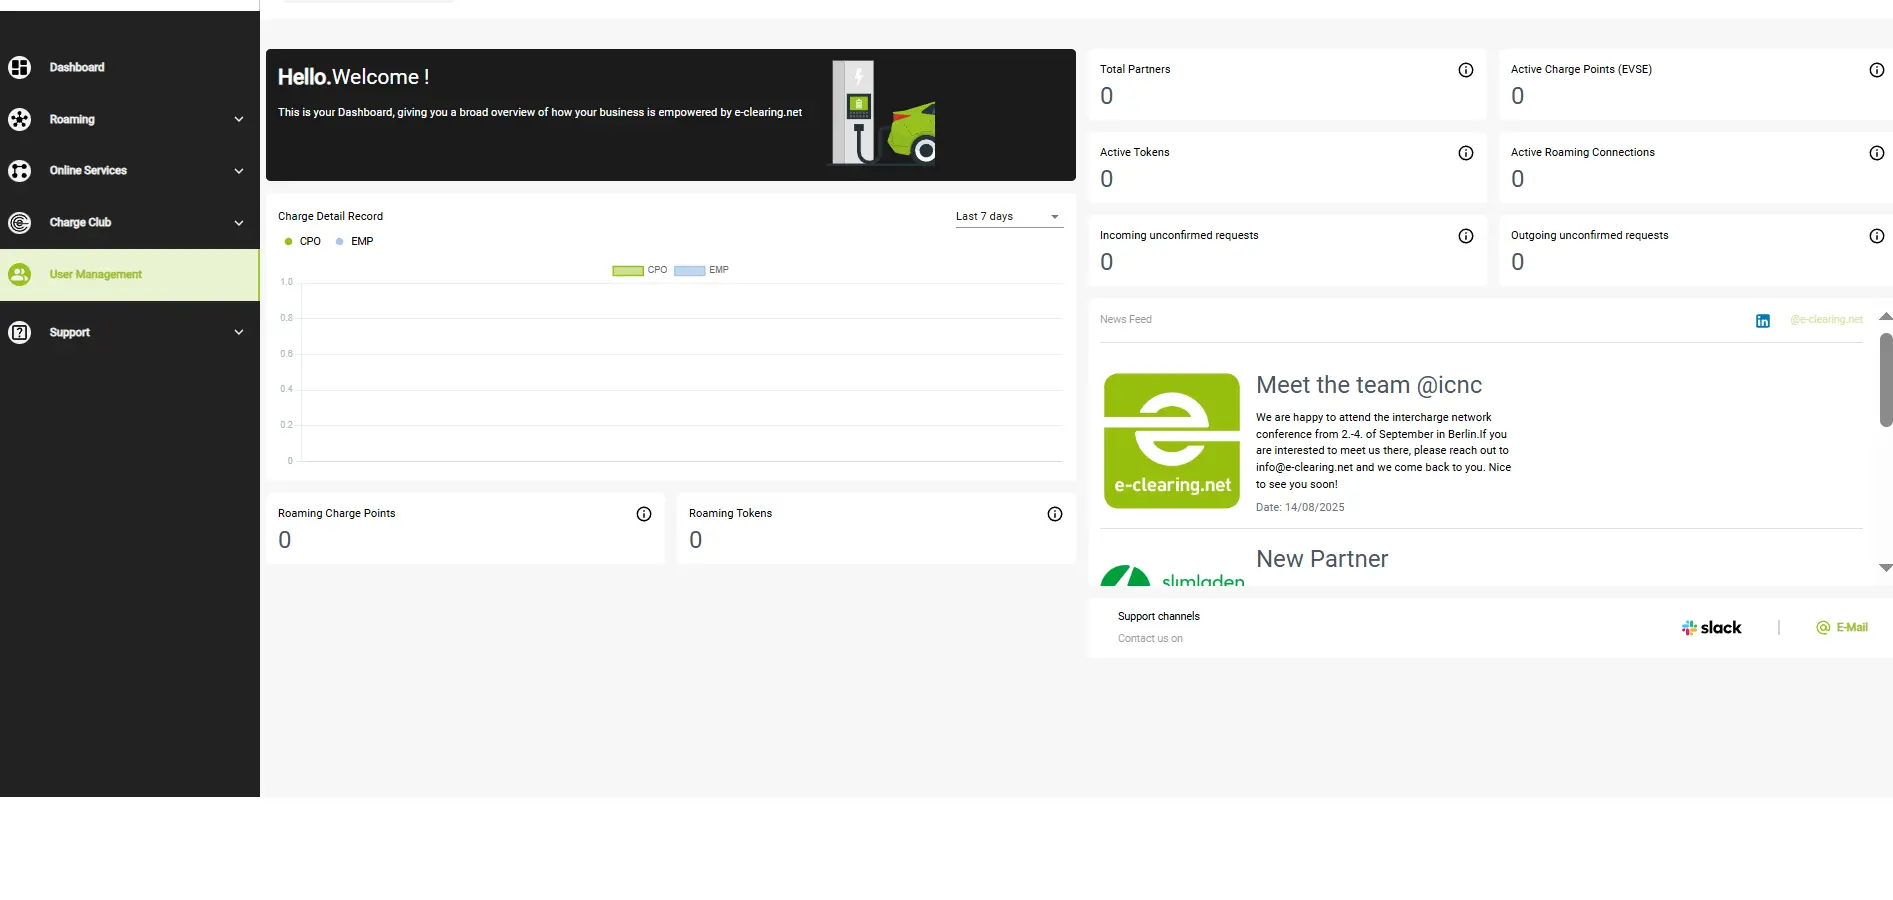
The Dashboard is the landing page of the new ECHX frontend, and it includes the following sections:
- Charge Detail Records (CDRS) for the last 7 days
- A pop-up button to e-clearing.net’s LinkedIn page
- e-clearing.net’s News feed with latest news
- e-clearing.net Support Channels
- Counts and insights related to your network and roaming partners
- Details of the network to which the user belongs
Below are the counts displayed in the Dashboard:
The displayed count depends on:
- The permissions of the active user
- The selection in the network header (if the user has permission to more than one network)
The left-hand side Menu allows navigation through various functionalities like Roaming, Online Services, Charge Club, User Management and Support.
Roaming
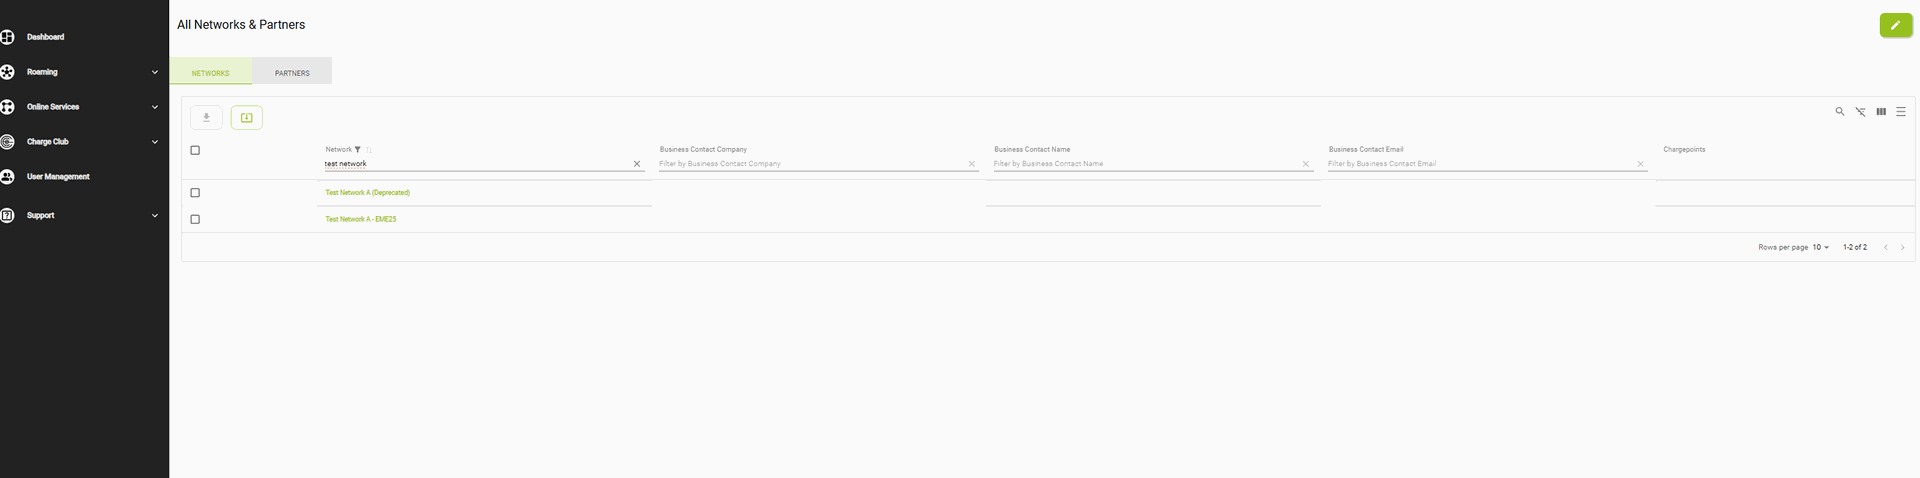
- This screenshot shows the "All Networks & Partners" section of the platform, with the "Networks" tab currently selected. It displays a list of connected networks along with relevant business contact details. The visible columns include the network name, associated company, contact person, email address, and charge points . Some entries are marked as "deprecated," indicating they are no longer active. Filters are available at the top of each column to search or narrow down the results. Users can also navigate between pages at the bottom or use the export and selection tools at the top left of the table.
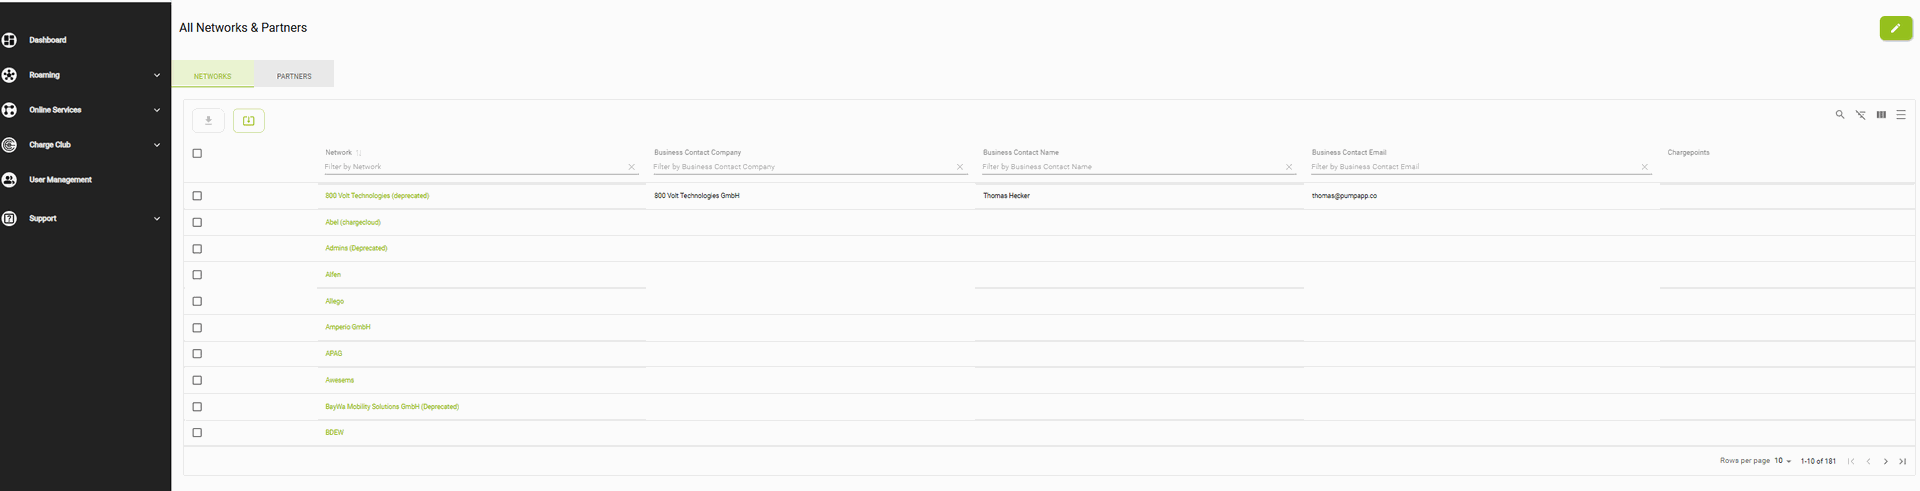
- Columns such as Network, Business Contact Company, Business Contact Name and Email can be used to filter search results.
- The "Export Network/Partner List" functionality allows users to easily export detailed information about networks and partners directly from the frontend.
Networks
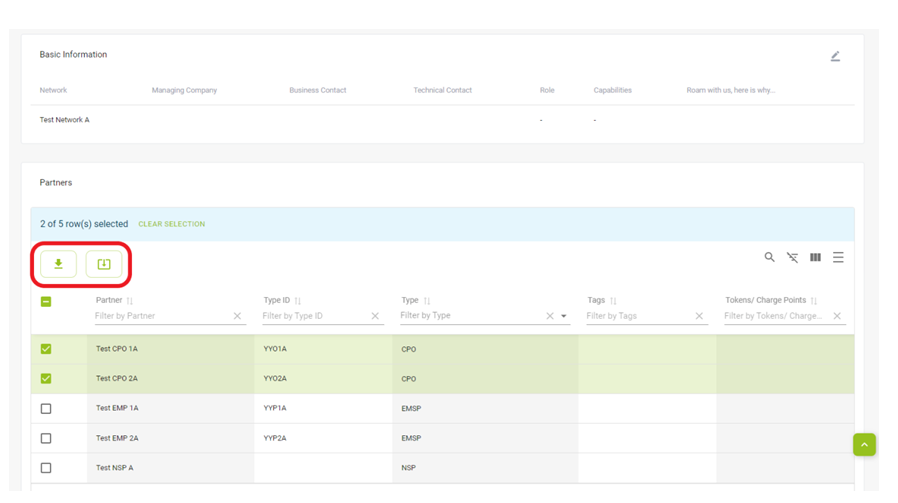
- Specifically selected rows can be exported by choosing the desired networks and clicking the export button.

- All networks can also be exported by clicking the ‘Export All’ button

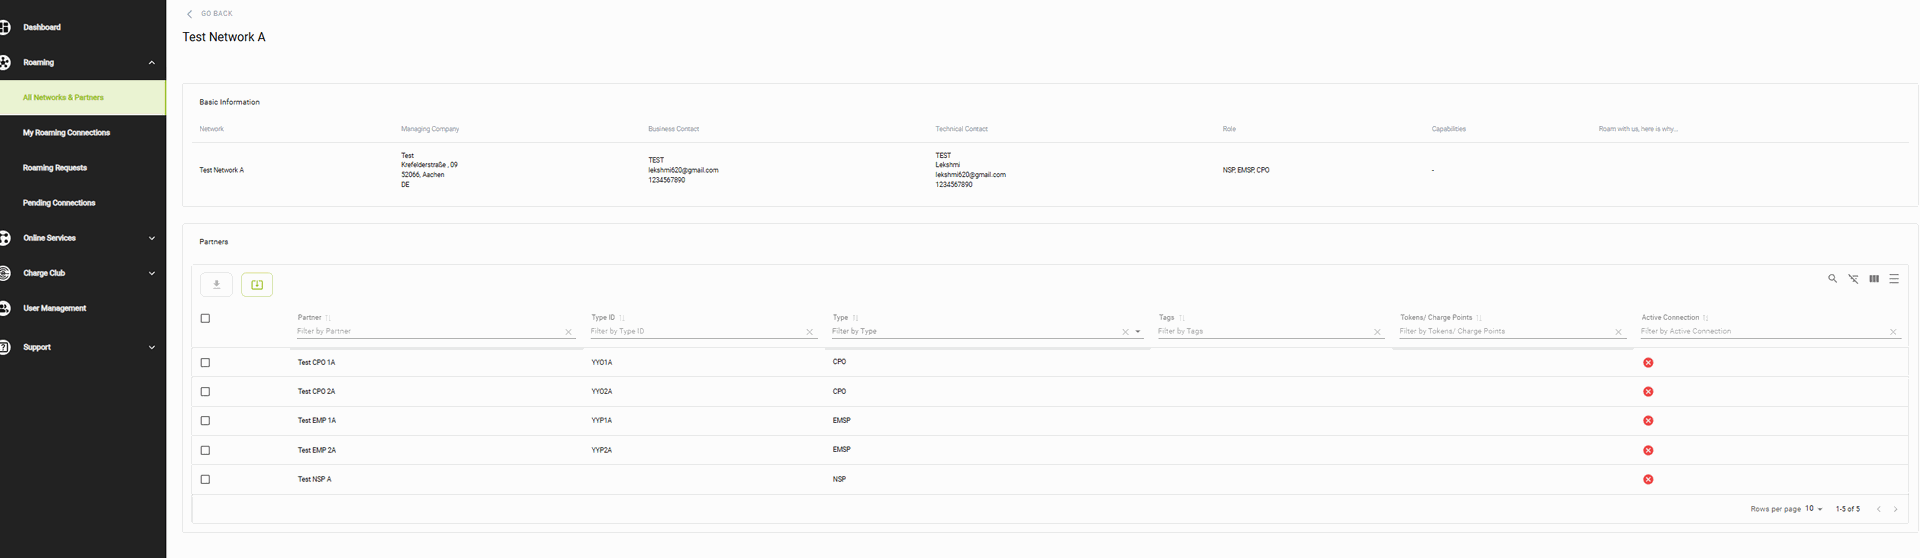
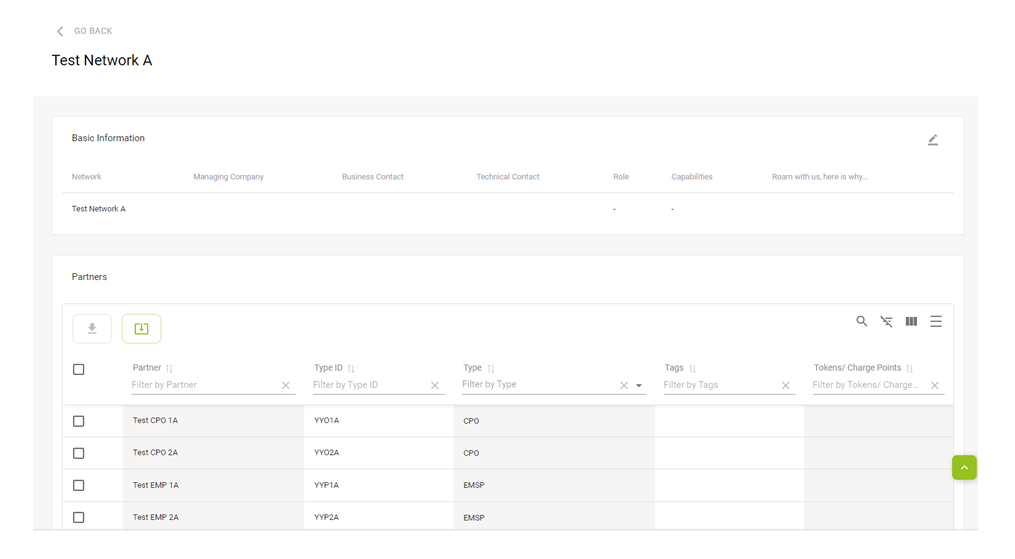
This screenshot shows the detailed view of a test network named "Test Network A" on the e-clearing.net platform. At the top, under Basic Information, you can see the network name, managing company address, business and technical contact details, and the assigned roles — in this case, the network is marked as NSP, EMSP, and CPO.
Below that, the Partners section lists all the partners within this network. Each row shows the partner name (e.g., Test CPO 1A, Test EMP 2A), their Type ID, role type (CPO, EMSP, or NSP), and information about tokens/charge points and active roaming connections. In this case, all listed partners have no active connections, as indicated by the red "X" icons in the last column.
Partners
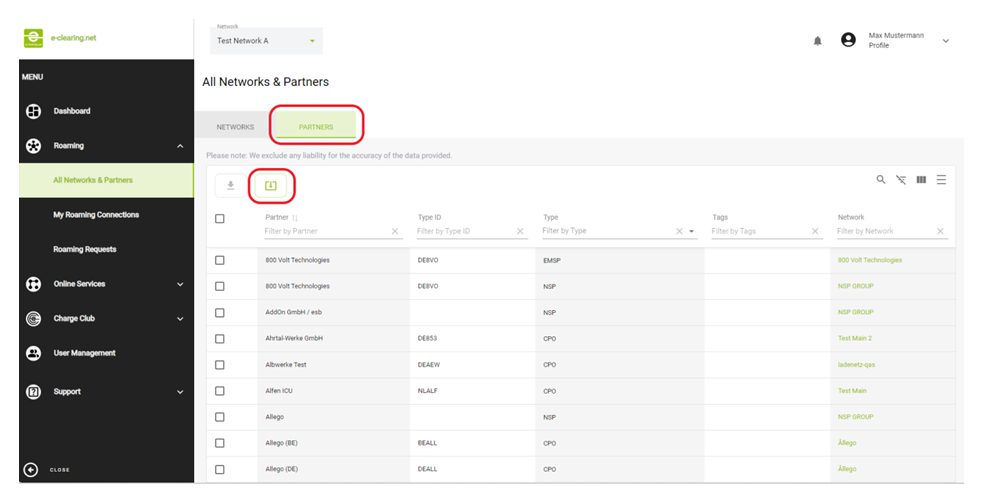
- Specific rows of partners can be exported by selecting certain networks and clicking the export button.
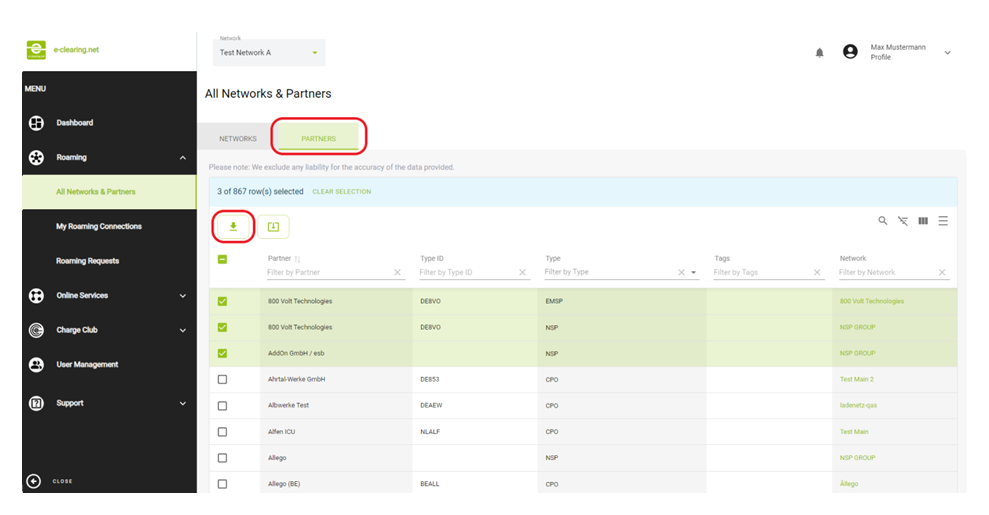
- All partners can also be exported by clicking ‘Export All’ button, which will generate a file containing the complete list of partners in the system.
- The exported data contains the following details for each selected partner:
- Organisation users, regardless of their permission roles, can also view the detailed information of networks and partners.
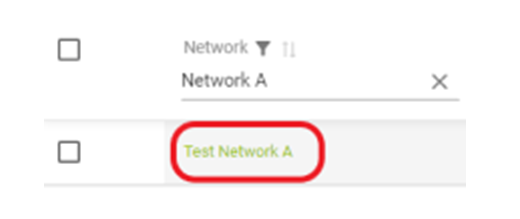
- Clicking on the green network ID will show you to the basic information about each network and a list of partners within the selected network.
- A partial export or a full export of the partners within the selected network can also be executed.
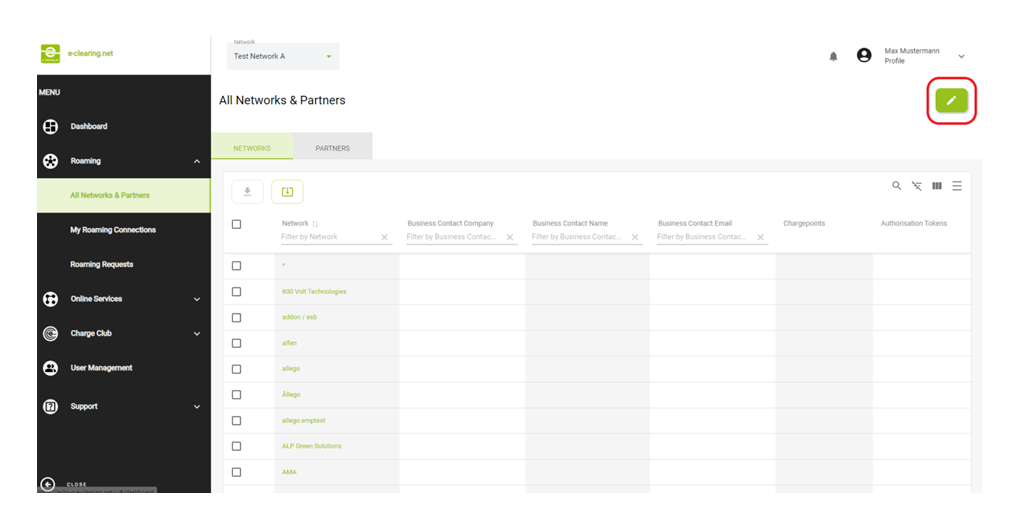
- An organisation user with admin rights can create/edit the contact details.
- The "Edit Network Contact Details" button opens a pop-up window where users can enter contact details.
- If contact information was previously added, the "Edit Network Contact Details" button displays the existing details, which can be edited as needed.
The user can add or edit the following details to update or edit the contact information:
- Business Contact
- Technical Contact
- Managing Company Details
- Message to partners explaining why they should roam with your network.
- Notification Emails
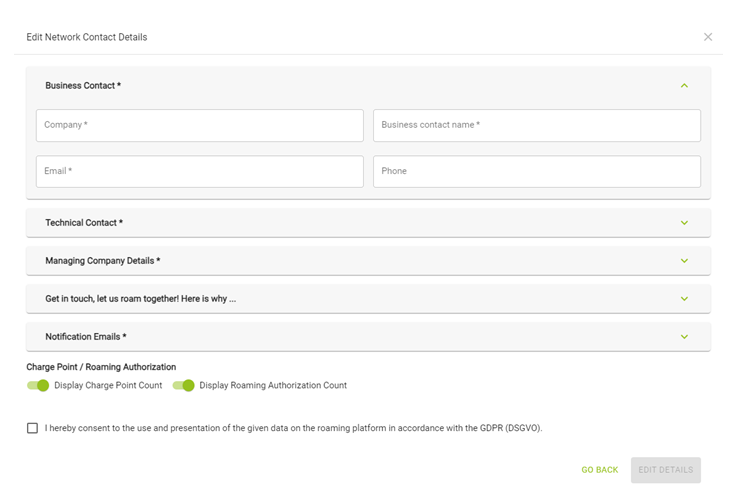
- On confirming the changes, the user is asked to provide consent for using and presenting the entered information, after which the details are saved to the ECHX.
Roaming Management
My Roaming Connections Overview
By selecting the 'My Roaming Connections' menu item under the Roaming section, an Organisation User with Admin, Roaming, or Monitoring permissions can view all existing roaming connections between their network and other networks
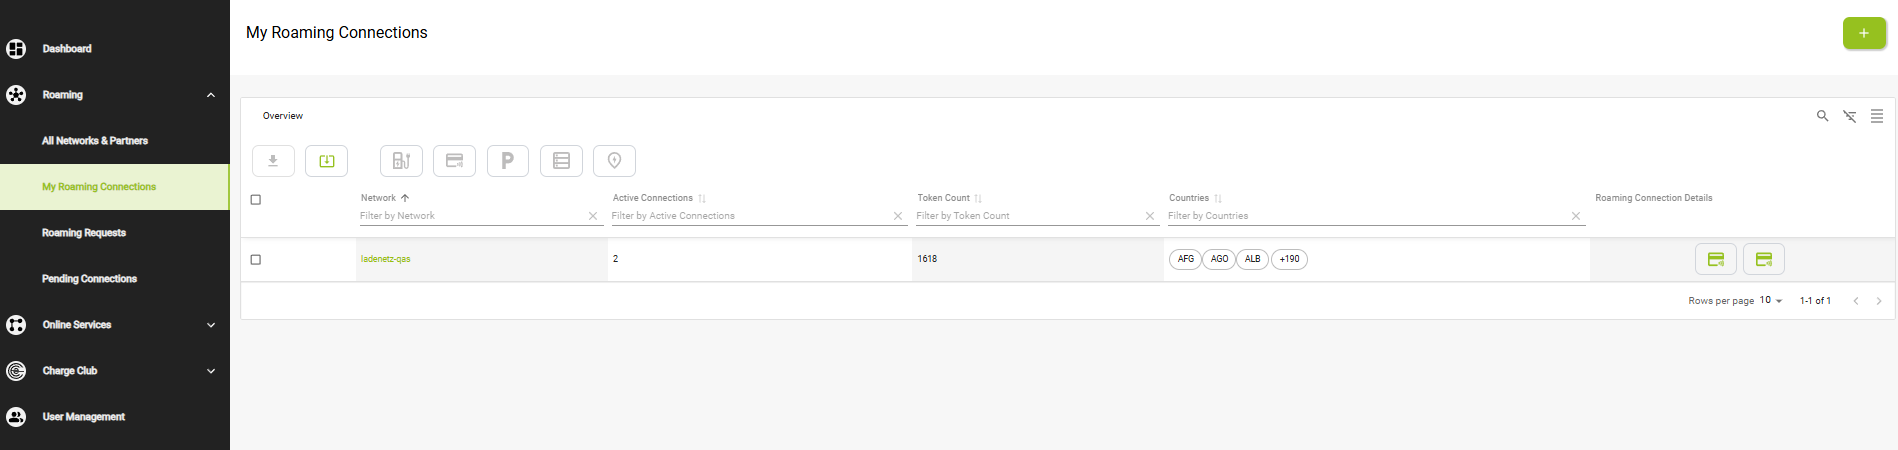
- The overview of your roaming connections displays the networks that you have an active roaming connection with including the following filter-searchable information:
Roaming Connection Types
The roaming connection feature in eCHX lets you manage and monitor how your network links with partner networks—from charging relationships to parking and data-sharing. Connections are grouped into clear categories so you can filter, review, and maintain them in one place. Below are the available roaming connection types:
- CPO Connection
- EMP Connection
- Parking Management
- Data Access
- NSP Roaming
- You can filter your roaming connections based on their type in the overview. This functionality allows you to easily view and manage your connections with other networks, categorized by their specific type. For example, you can filter to display all Parking Management connections with other networks.
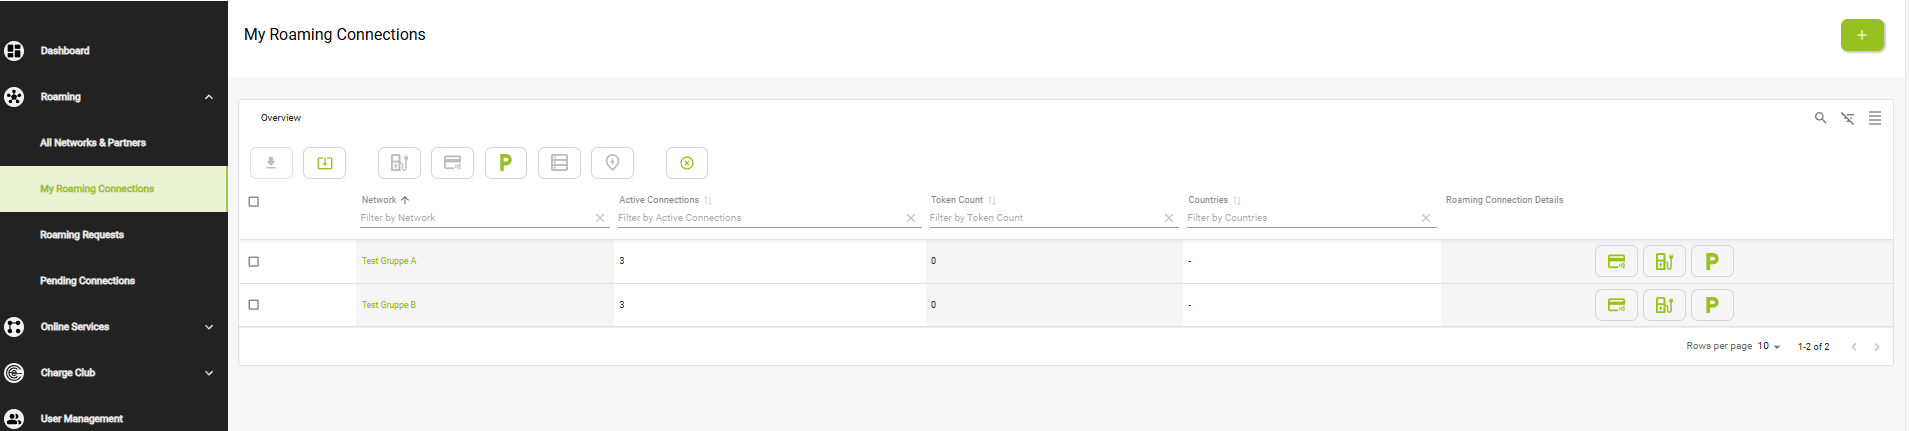
- Clicking on the icons under the roaming connection details filter will provide you with the specific details of the selected roaming connection.
Creating Roaming Connections
- To establish a new roaming connection, click the plus button in My Roaming Connections overview.

- After confirmation, you can select the network you want to roam with and specify the start date for the roaming connection. Note that the start date must be in the future to successfully establish the connection.

- In the next step, you will be able to choose between the four roaming connection types: EMP, CPO, Parking and Data Access. Note that the EMP and CPO connections are customizable.
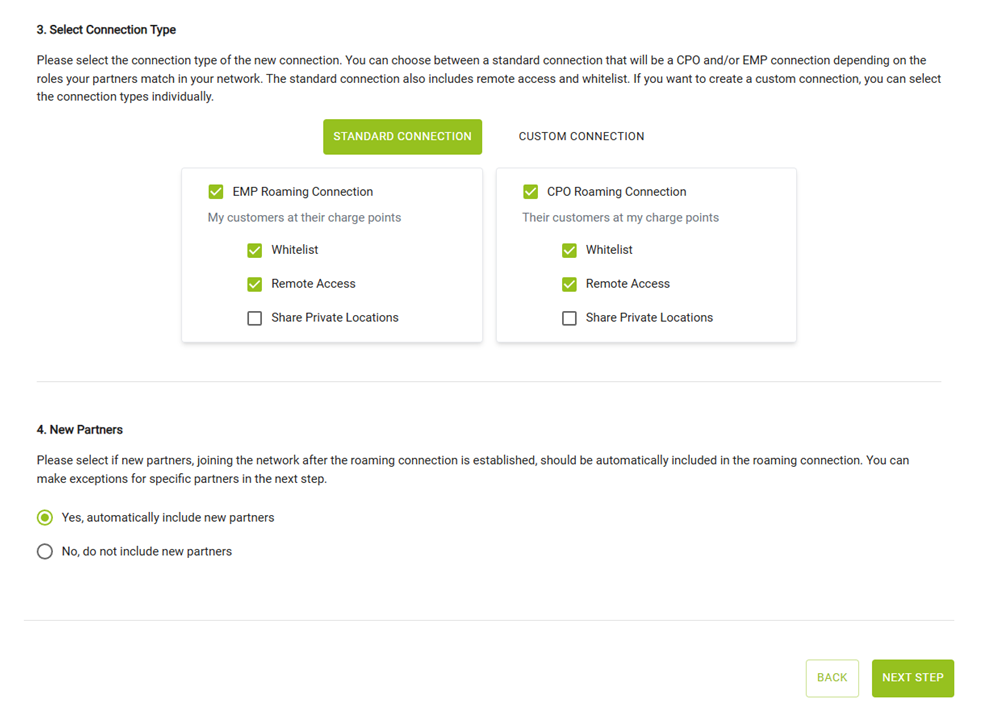
- For the roaming connection setup, the Standard Connection option was selected. This automatically enables both connection types: EMP Roaming Connection (allowing my customers to access partner charge points) and CPO Roaming Connection (allowing partner customers to use my charge points). In both cases, the Whitelist and Remote Access options are enabled, while the Share Private Locations option remains disabled. Additionally, it was decided to automatically include all new partners who join the network after the roaming connection is established. This configuration ensures smooth and scalable interoperability with both current and future partners.
- These customisations go as following:
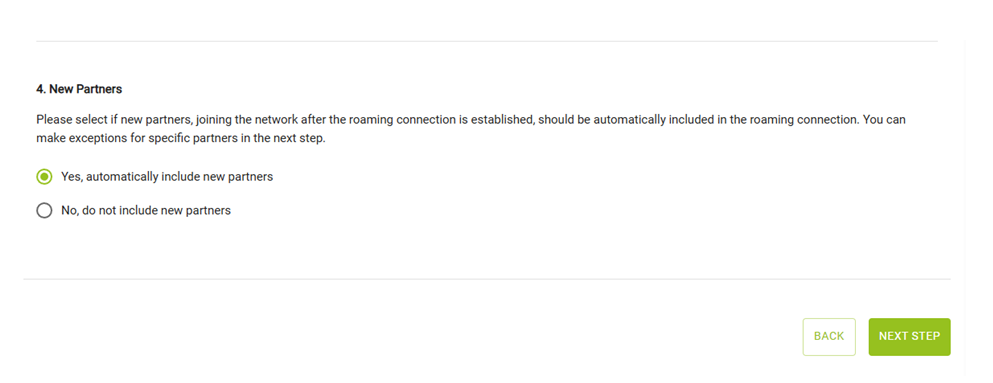
- This segment also includes an option for ‚New Partners‘, which allows you to specify whether any new partners joining your network should be automatically included in the selected roaming connection.
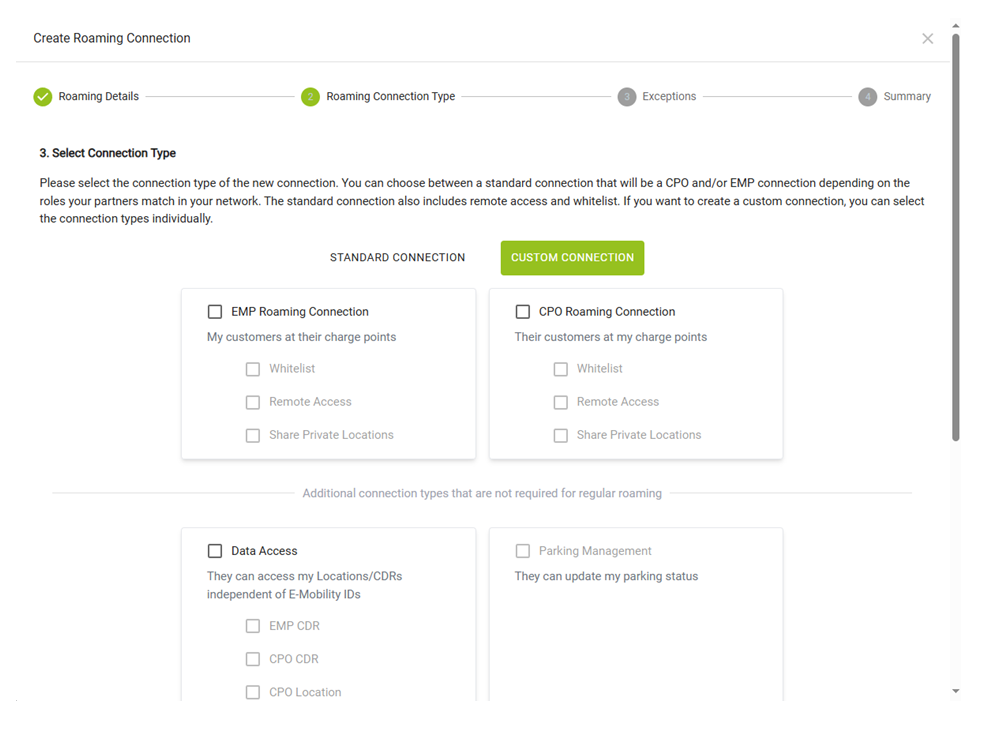
- In this step of the roaming connection setup, the Custom Connection option is selected. This allows for manual configuration of the roaming connection types based on the partner’s role in the network. Two primary roaming types can be enabled: EMP Roaming Connection (allowing my customers to charge at partner charge points) and CPO Roaming Connection (allowing partner customers to charge at my charge points). For each type, additional options such as Whitelist, Remote Access, and Share Private Locations can be activated individually. In this configuration, none of the options have been selected yet. Below, there are also two additional, optional connection types not required for regular roaming: Data Access, which allows partners to access my Locations and CDRs independently of E-Mobility IDs (with sub-options for EMP CDR, CPO CDR, and CPO Location), and Parking Management, which enables partners to update my parking status. These advanced settings offer a high degree of customization for specific use cases or data-sharing agreements.
1. EMP Roaming Connection
- My customers at their charge points
- With this option, you allow your customers to charge at the partner's charge points.
✔️ You act as an EMP, and the partner acts as a CPO.
- Options:
- Whitelist: only authorized tokens from your customers will be accepted.
- Remote Access: your customers can start/stop charging remotely.
- Share Private Locations: the partner allows your customers access to their private charge points.
2. CPO Roaming Connection
- Their customers at my charge points
- With this option, you allow the partner’s customers to charge at your charge points.
✔️ You act as a CPO, and the partner acts as an EMP.
- Options:
- Whitelist: only partner tokens you approve will be accepted.
- Remote Access: the partner’s customers can control charging remotely.
- Share Private Locations: you allow access to your private charge points.
3. Data Access
- They can access my Locations/CDRs independent of E-Mobility IDs
- With this option, you allow the partner to access your charge point and session data even if it's not linked to specific e-mobility tokens.
- Sub-options:
- EMP CDR: the partner can view session data for your customers.
- CPO CDR: the partner can access session data from your charge points.
- CPO Location: the partner can access your list of charge point locations
4. Parking Management
- With this option, you allow the partner to update the parking status of your locations (e.g. available, occupied, reserved)
-
This segment also
includes an option for ‚New Partners‘, which allows you to specify whether any
new partners joining your network should be automatically included in the selected
roaming connection

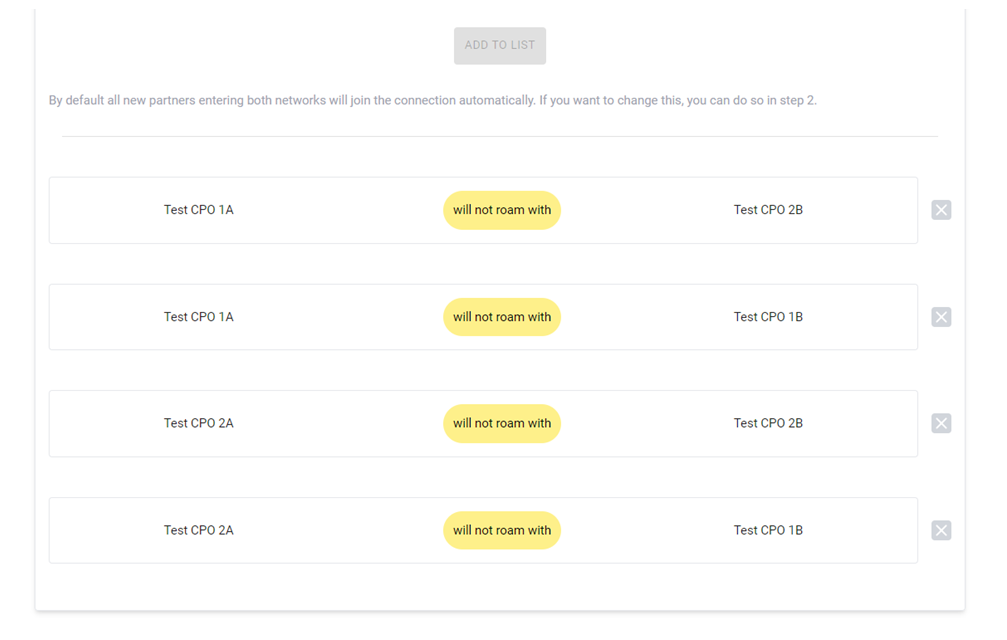
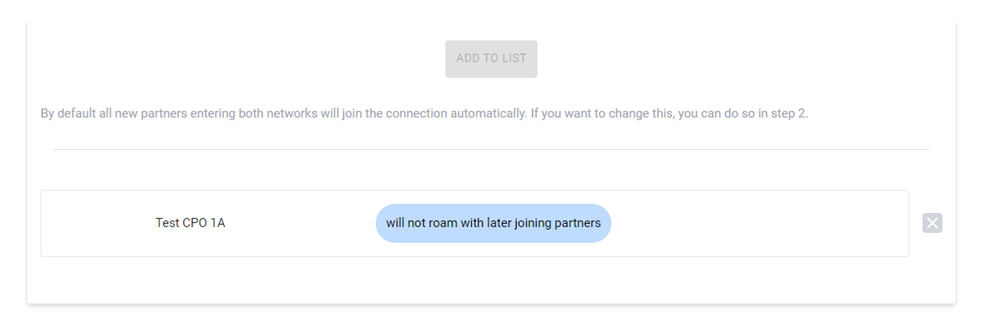
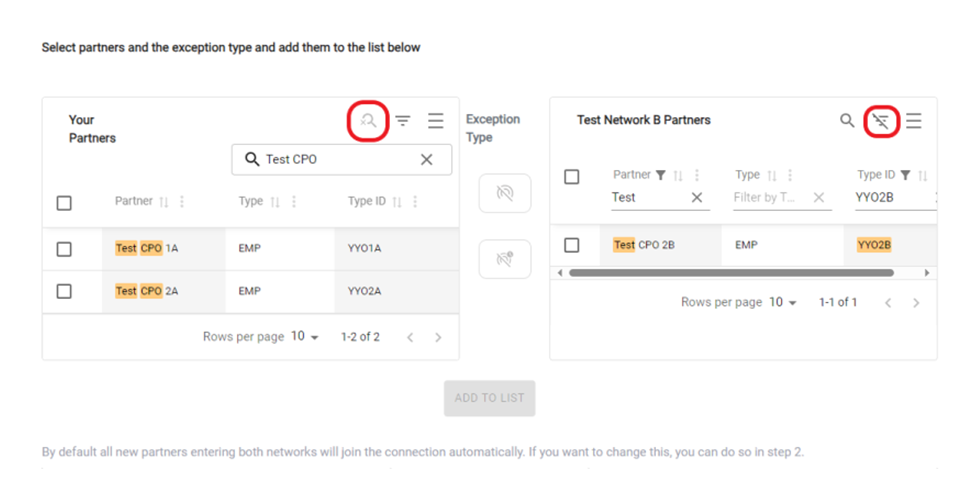
- Partners can be excluded in two types:
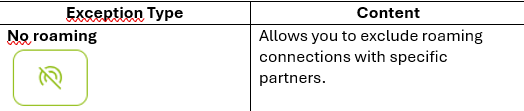
- To exclude specific partners from the roaming connection, simply select the partners from the list, choose the exception type ‚No Roaming‘ and click ‚ADD TO LIST‘ button.
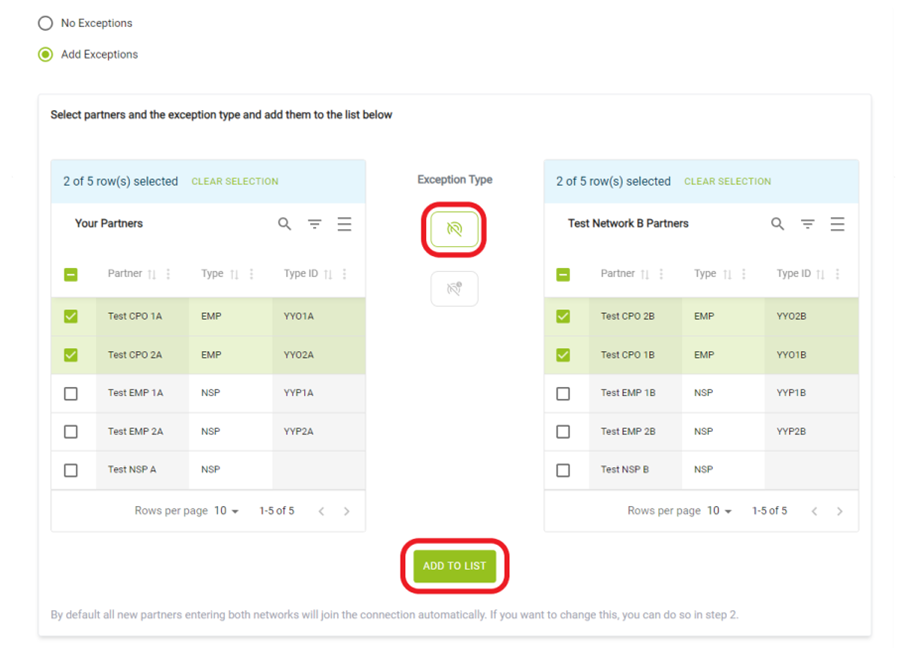
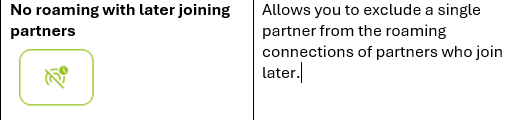
- To exclude a partner from the roaming connections of later joining partners, simply select the partner, choose the exception type ‚No roaming with Later Joining Partners‘ and click the ‚ADD TO LIST‘ button.
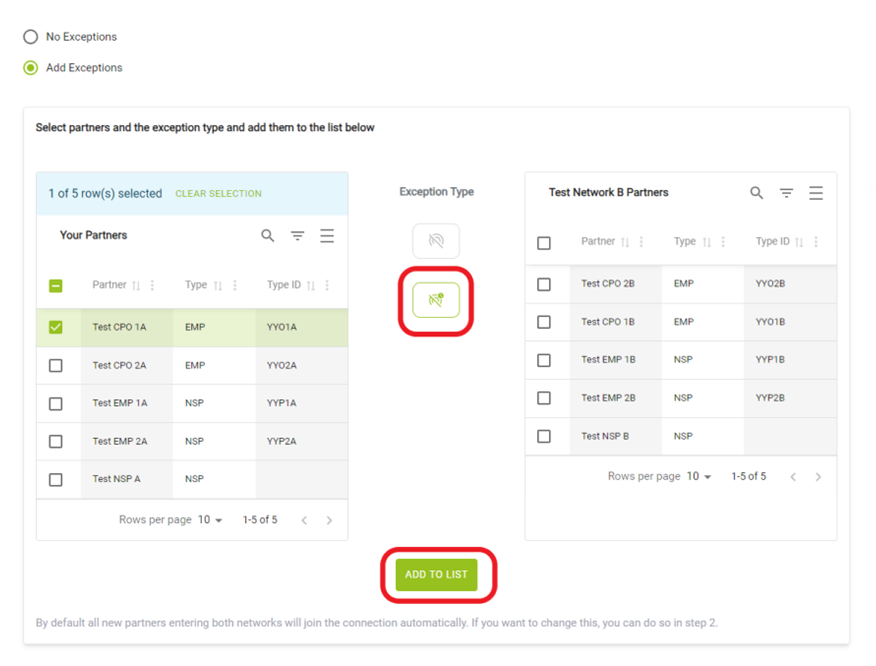
- While searching for partners in the list, you can search by name or enable filter search to find the designated partner within the network.
- After configuring the exceptions, the next step is to review a summary of the roaming connection request that will be sent.

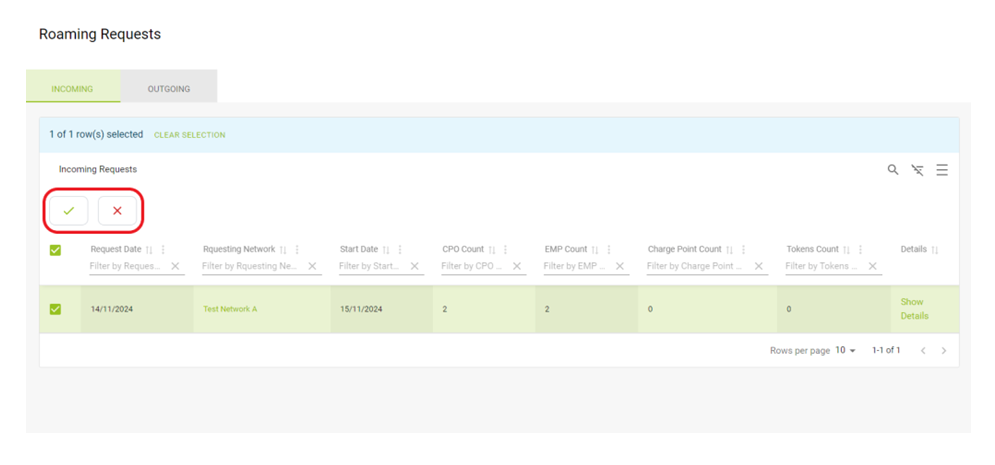
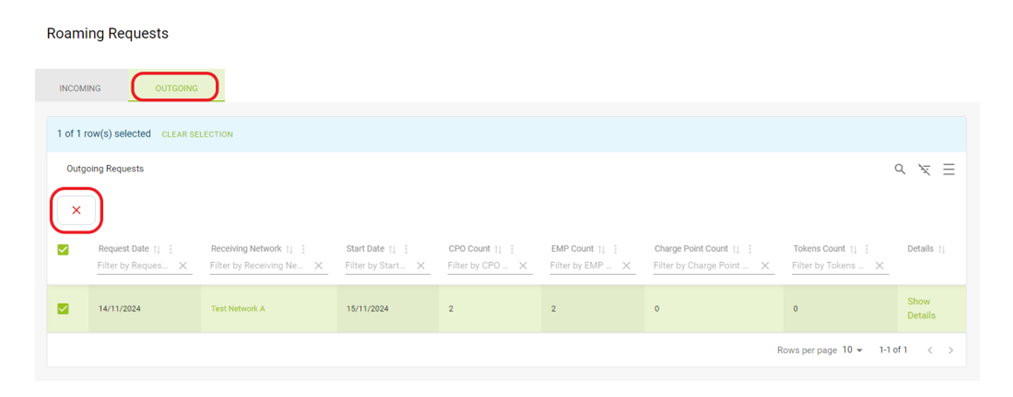
- The Roaming requests section allows you to manage your incoming and outgoing roaming requests.
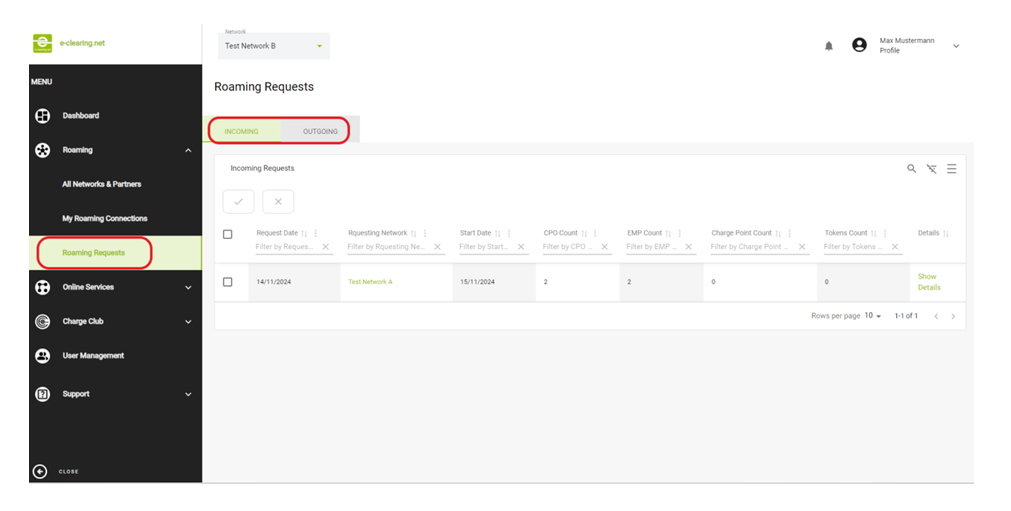
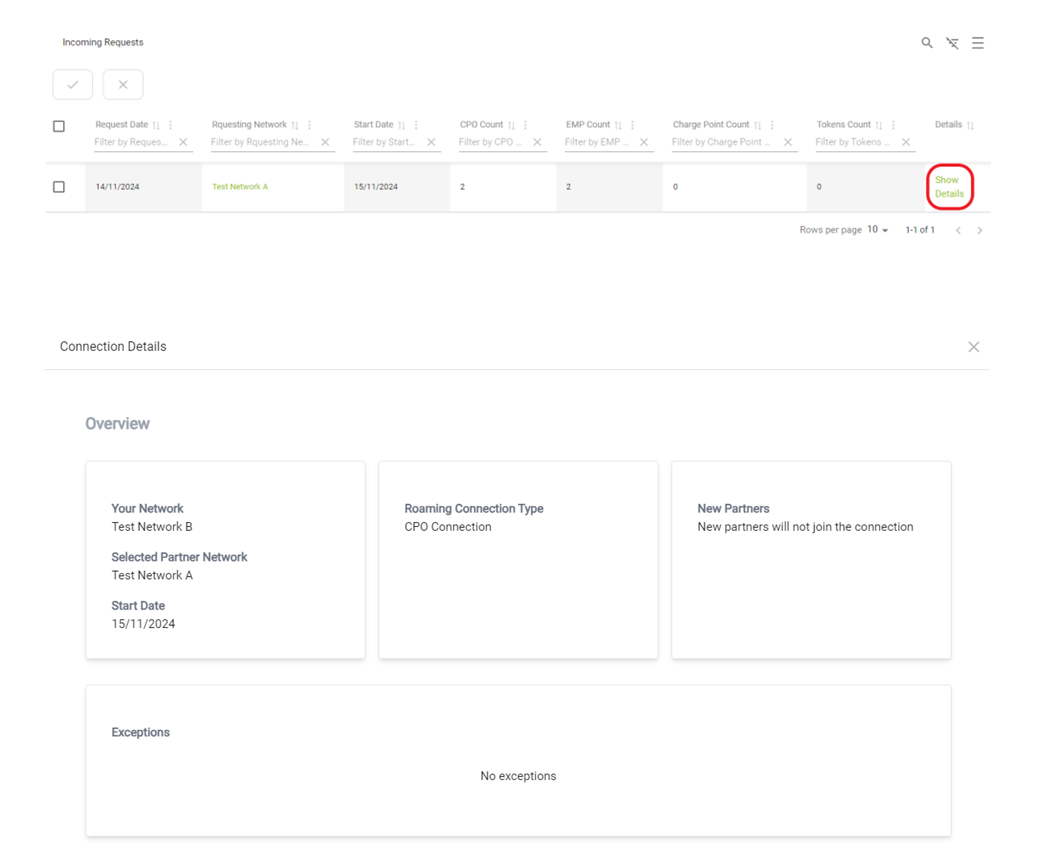
- By clicking the ‚Show Details‘button, you can view the details of the roaming connections.
Incoming Roaming Requests
- In the incoming roaming requests overview, you can accept or decline roaming requests sent to your network. Simply select the roaming connections you want to accept, then click the ‚Accept‘or ‚Decline’ button.
Outgoing Roaming Requests
- In the outgoing requests overview, you can view the roaming requests sent to other networks. You also have the option to cancel these outgoing requests.
Pending connections
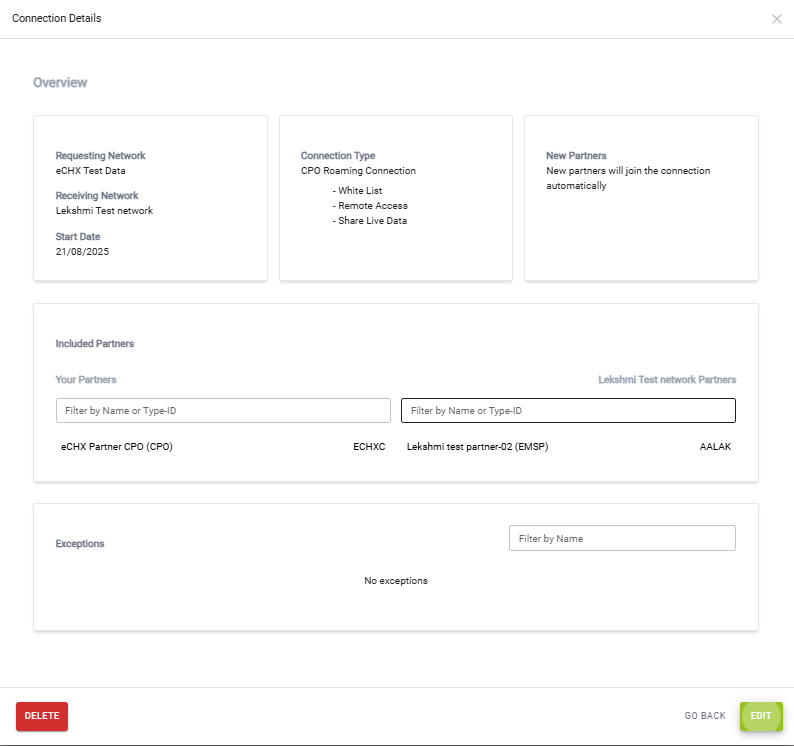
Any changes or edits to existing roaming connections also require your or your partner’s approval and will be listed under Pending Connections.
- Edits or changes initiated by CPOs will appear in the Incoming section of Pending Connections.
- Edits or changes you initiate towards other CPO partners will appear in the Outgoing section of Pending Connections.
Incoming Pending Connections
Displayed properties:
- Request Date
The date when the roaming connection request was submitted. -
Requesting Network
The name of the partner or network that initiated the request. -
Start Date
The planned start date for the roaming connection. -
Charge Point Count
The total number of charge points included in the pending connection request. -
Tokens Count
The number of tokens shared as part of the connection.
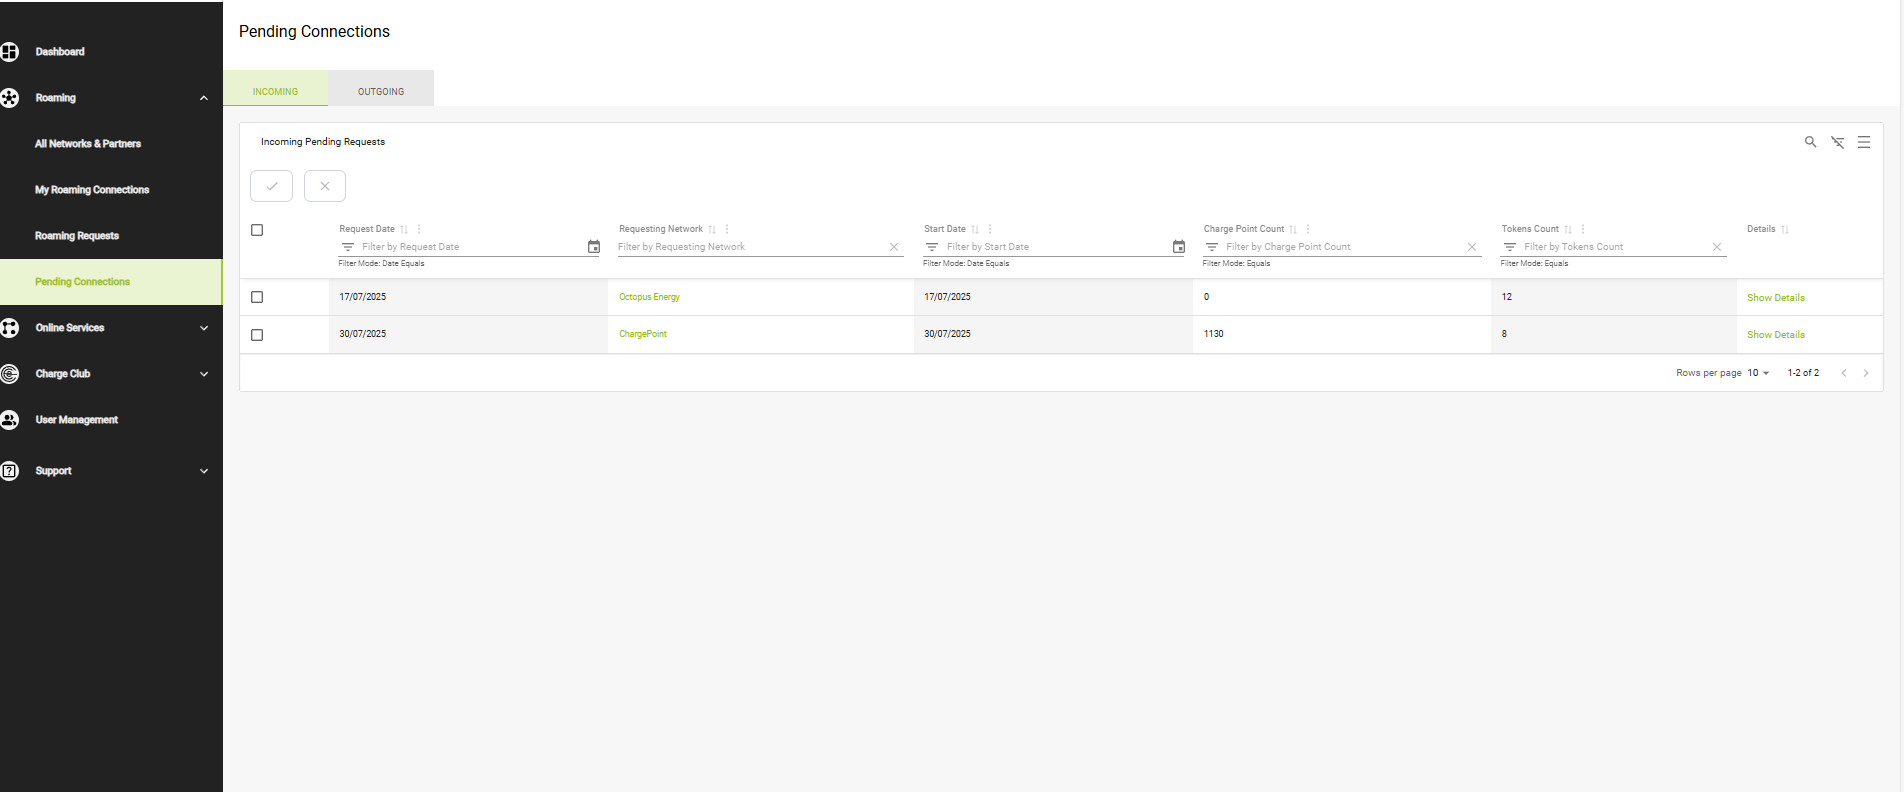
This table lists all incoming roaming requests that are still pending activation, showing when they were requested, who requested them, and how many charge points and tokens are included.
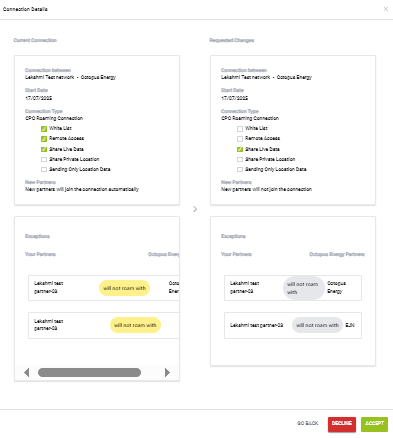
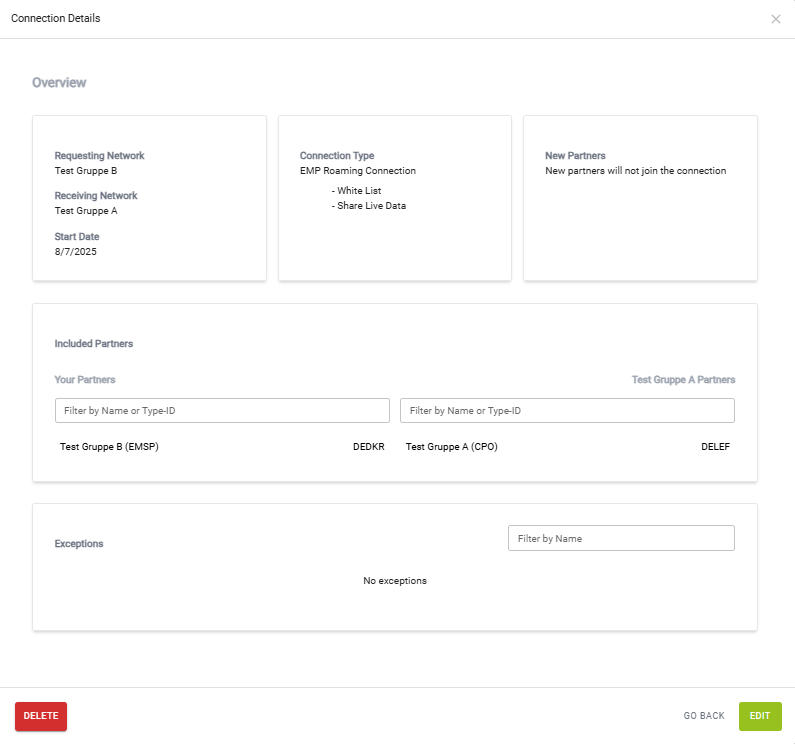
The Connection Details screen provides an overview of a roaming connection between two networks. It displays the current configuration alongside the requested changes, including the connection start date, connection type (e.g. whitelist, remote access, live data sharing, private or location data sharing), and whether new partners will automatically join the connection. In addition, it lists any exceptions, meaning partners that will not roam with each other despite being part of the networks. At the bottom of the screen, the user can either accept or decline the connection request.
Outgoing Pending Connections
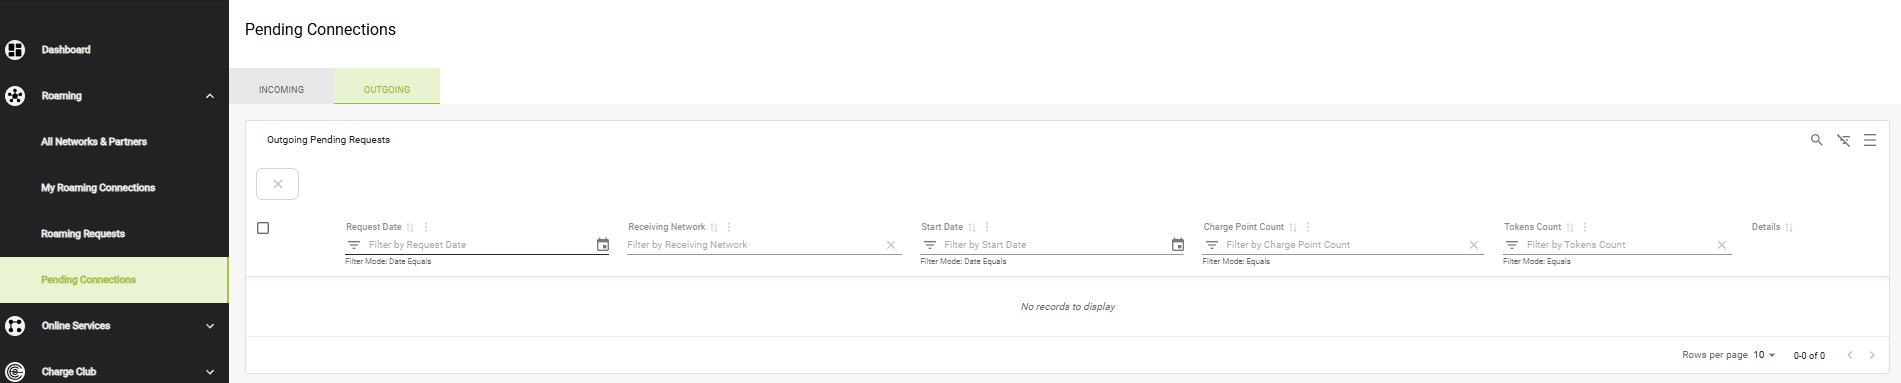
The Outgoing Pending Connections section shows all roaming connection requests that your network has sent to other partners but which are not yet active. These requests are still pending confirmation or activation by the receiving partner.
Delete/Edit Roaming Connections
- To edit or delete existing roaming connections, navigate to the My Roaming Connections overview.

- By clicking on the roaming connection icon under the roaming connection details, a page will appear where you can edit or delete the roaming connection.
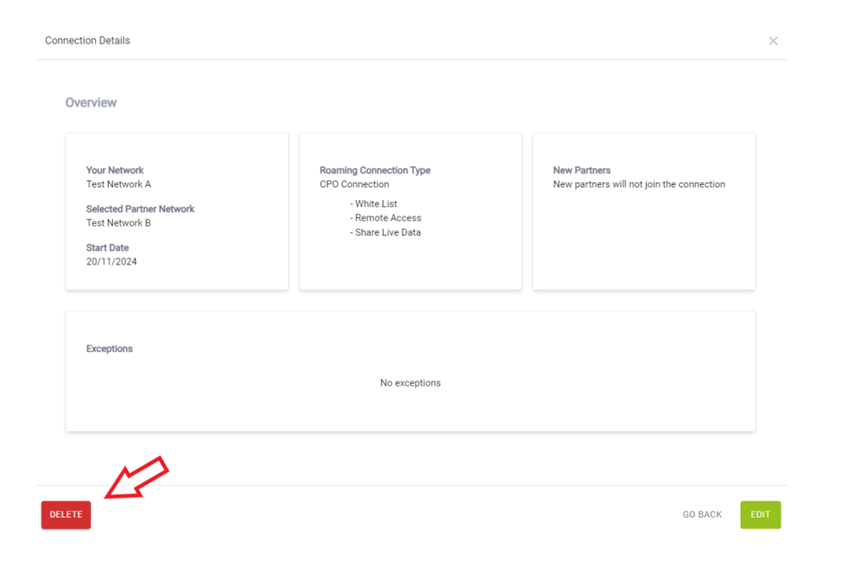
Edit Roaming Connections
- To edit the roaming connection, click the ‘Edit’ button.
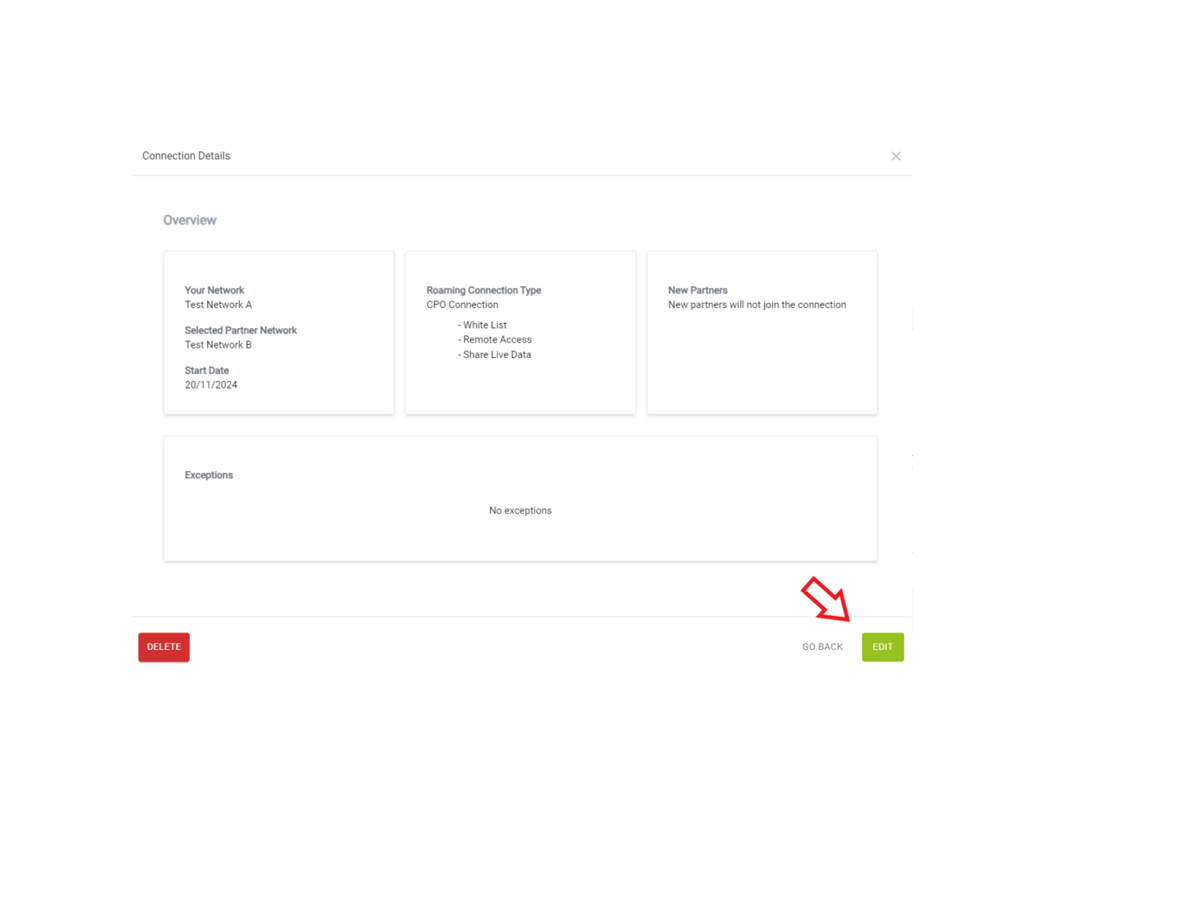
- Once clicked, you can edit the roaming connection using the same interface and parameters as when creating a roaming connection. (See „Create Roaming Connections“ section.)
- After making changes, the edited roaming connection will be resubmitted to the partner network for approval.
ONLINE SERVICES
By selecting the Card Management menu item under Online Services, users can check and verify their own customer cards.
- On selecting the Menu Item Card Management under Online Services, the user can verify the card status, regardless of the user permission roles.
- As an EMP you can enter the Contract ID or Token UID to check the validity of the card.
- Please adhere to the normalised expressions of how data is stored in e-clearing database.
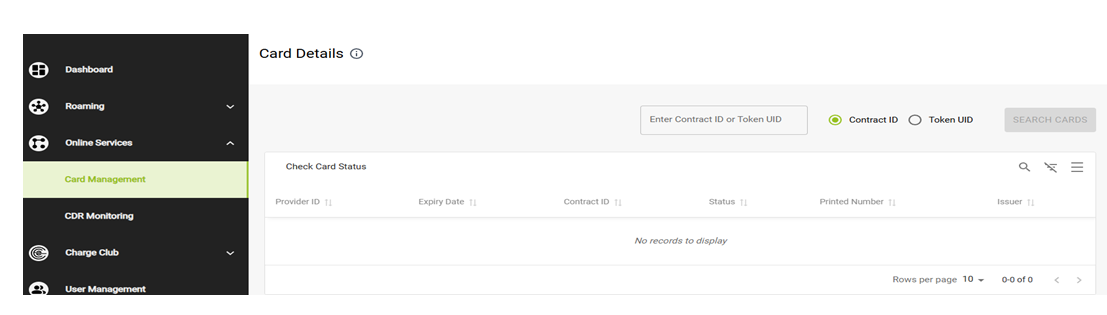
- After selecting the contract ID or Token UID and clicking the “Search Cards” button, following details will be displayed in the card details table:
By selecting the CDR Monitoring menu item under Online Services, users can check the current status of Charge Detail Records (CDRs).
- CPOs can view and verify the status of their own CDRs pushed to eCHX.
- EMPs can see the CDRs pushed to eCHX by their respective CPO partners.
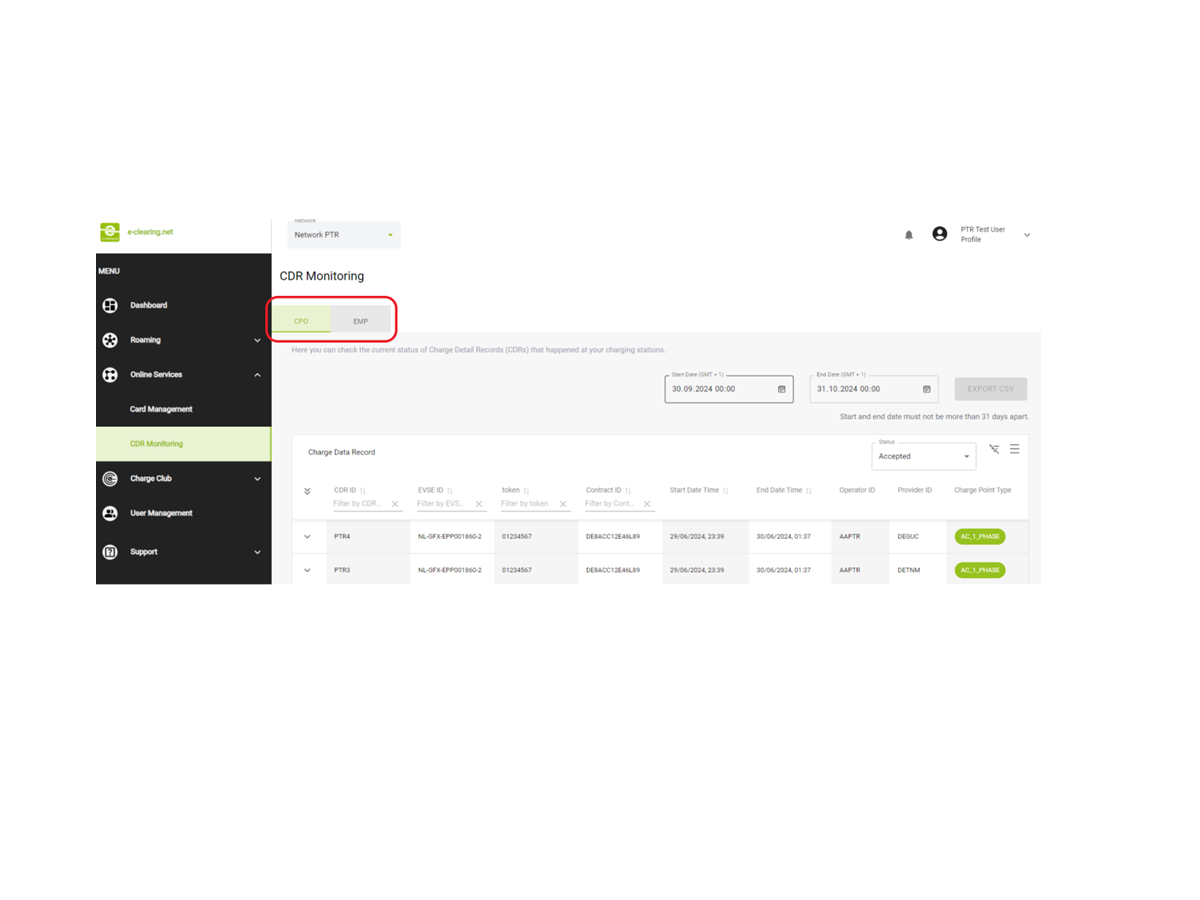
The CDRs will be displayed with the following details.
The status for the CDR details that are visible can be selected from the right top corner with the following statuses: Accepted, Rejected, Declined, Approved and Revised.

- The CDRs can be
filter-searched, and by clicking on the dropdown button for a specific CDR,
more details of the CDR will be displayed

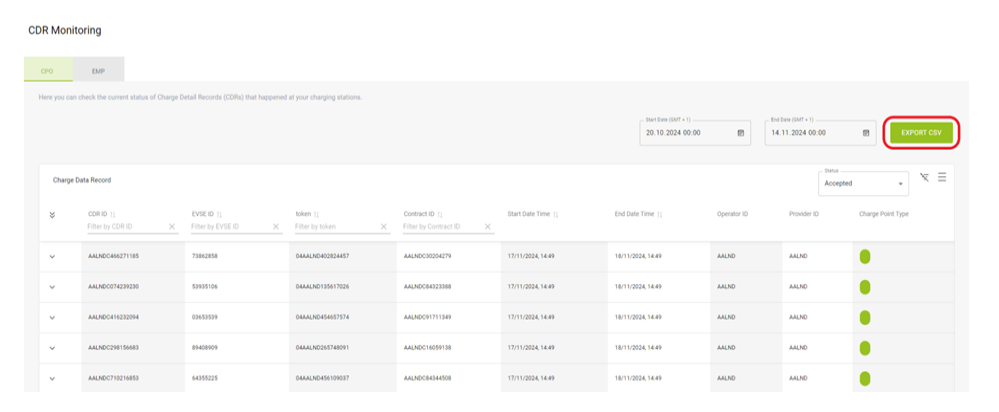
- You can also export the displayed CDRs from this page. Please note that the export supports a time period of up to 31 days, and the start date and end date must not exceed a 31-day range.
CHARGE CLUB
Introduction
- The Charge Club is an e-clearing.net feature that allows EMPs and CPOs to sign bilateral agreements directly on the portal. It provides a fast and easy way to start roaming without the need for negotiations and exchanging proposals outside of the platform.
- The CPOs can publish offers-to-all or EMP-specific offers on the Charge Club. Once an EMP accepts an offer, the technical connection is automatically established, and the roaming will start on the following day unless the CPO specifies another starting date. All the active contracts can be downloaded at any time from e-clearing.net.
Preconditions
- To publish and accept offers on the Charge Club both the EMP and the CPO need to be on the productive system of e-clearing.net. Moreover, both parties need to update their network contact details on the portal. This step is necessary, so that the system already has all the relevant data to automatically generate the signed roaming agreement once an EMP accepts a CPO offer (Check Edit/Create Network Details).

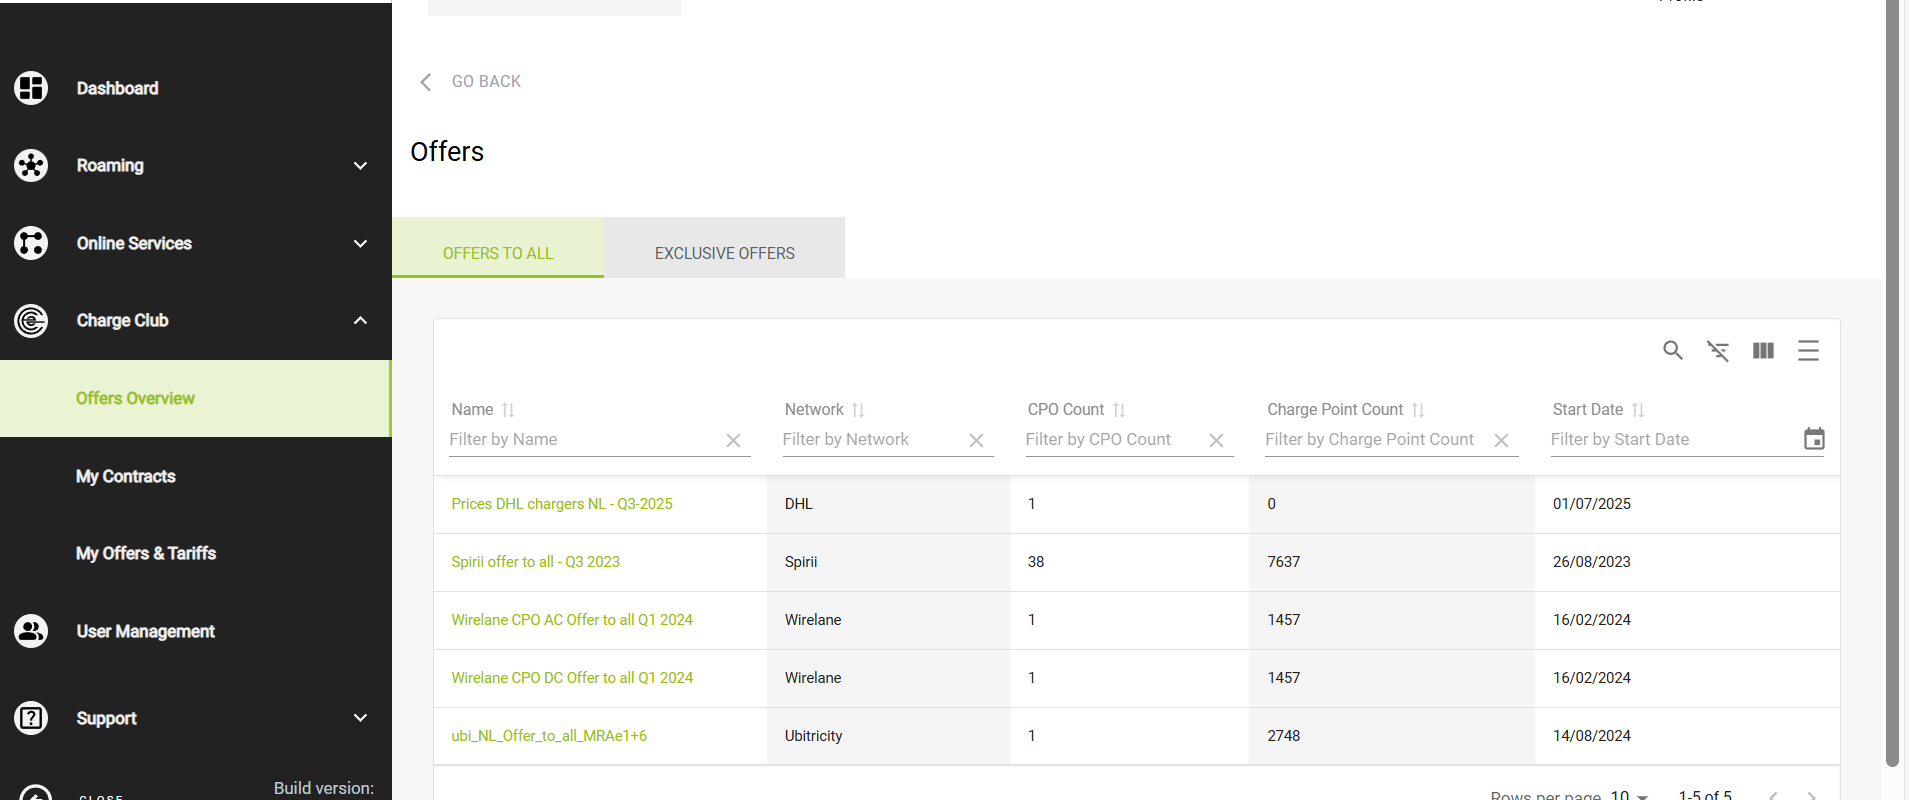
The "Offers Overview" section of the e-clearing.net platform allows users to view all available roaming offers between different operators. It is divided into two tabs: "Offers to All", which lists public offers accessible to all partners, and "Exclusive Offers", which includes offers limited to specific partners. Each offer is displayed as a row in a table with details such as the offer name, the issuing network, the number of included CPOs, the total number of charge points, and the start date. Filters are available at the top of each column to narrow down the results. In the top right corner, users can perform a manual search, apply or reset filters, switch between compact and detailed views, and customize the visible columns. This interface makes it easy to compare active offers within the selected network (in this case, "Ladenetz") and manage roaming access accordingly.
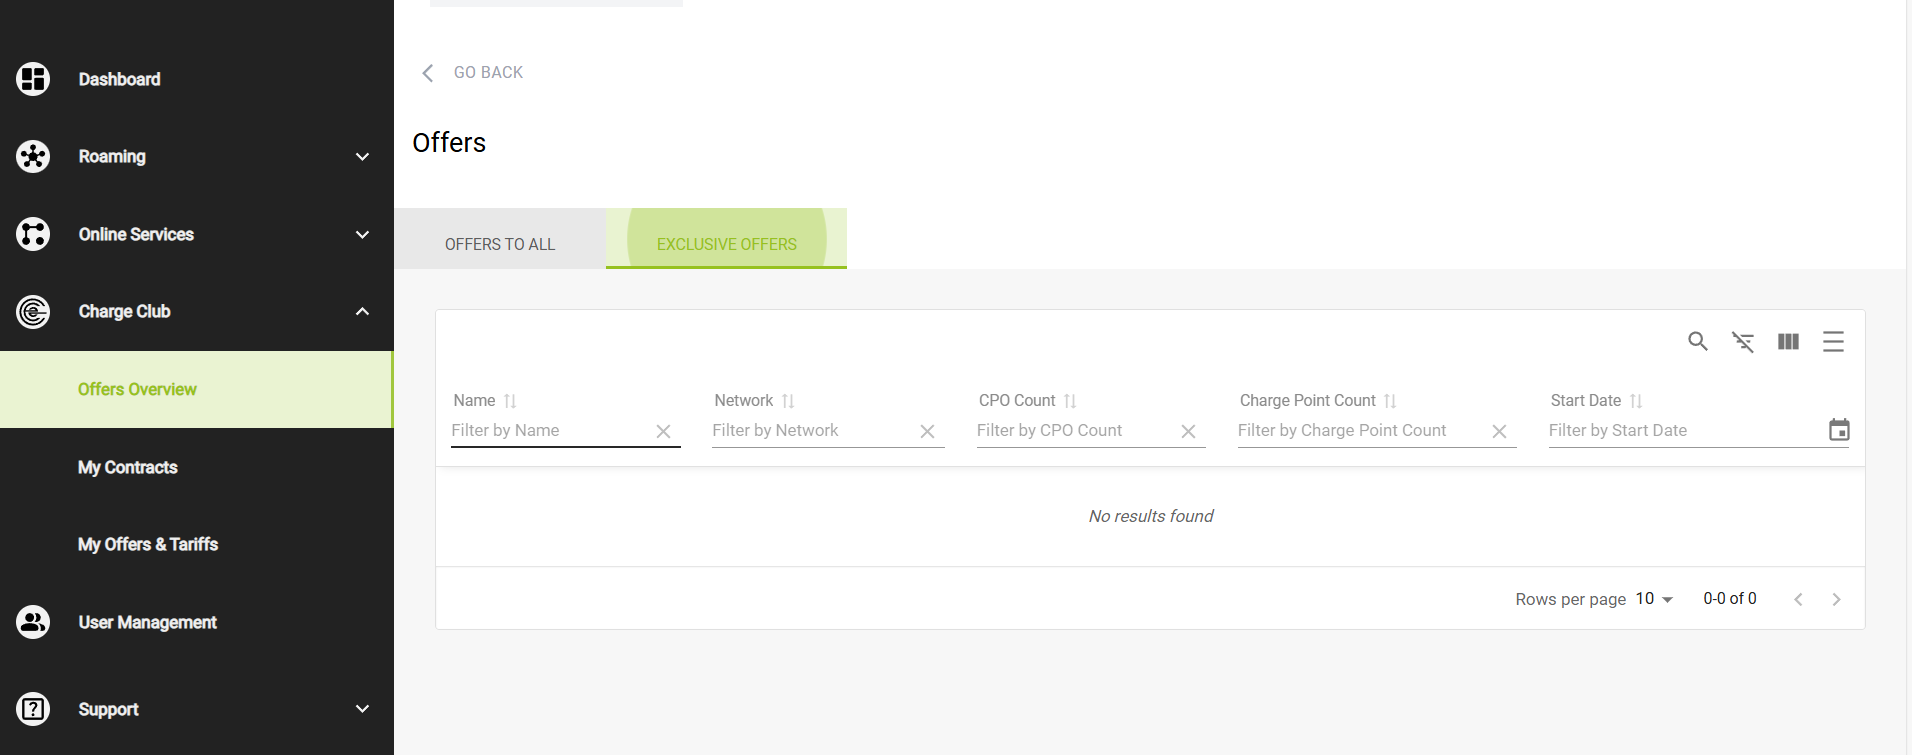
This screenshot shows the "Exclusive Offers" tab within the Offers Overview section of the e-clearing.net platform. Unlike the "Offers to All" tab, this view is dedicated to roaming offers that are available only to specific partners. In this case, the message "No results found" indicates that there are currently no exclusive offers visible for the selected network . The table structure remains the same, with columns for Offer Name, Network, CPO Count, Charge Point Count, and Start Date. Users can still apply filters or perform searches using the toolbar at the top right. If an EMP or CPO has not received any private roaming offers, this section will remain empty as shown.
My Contracts
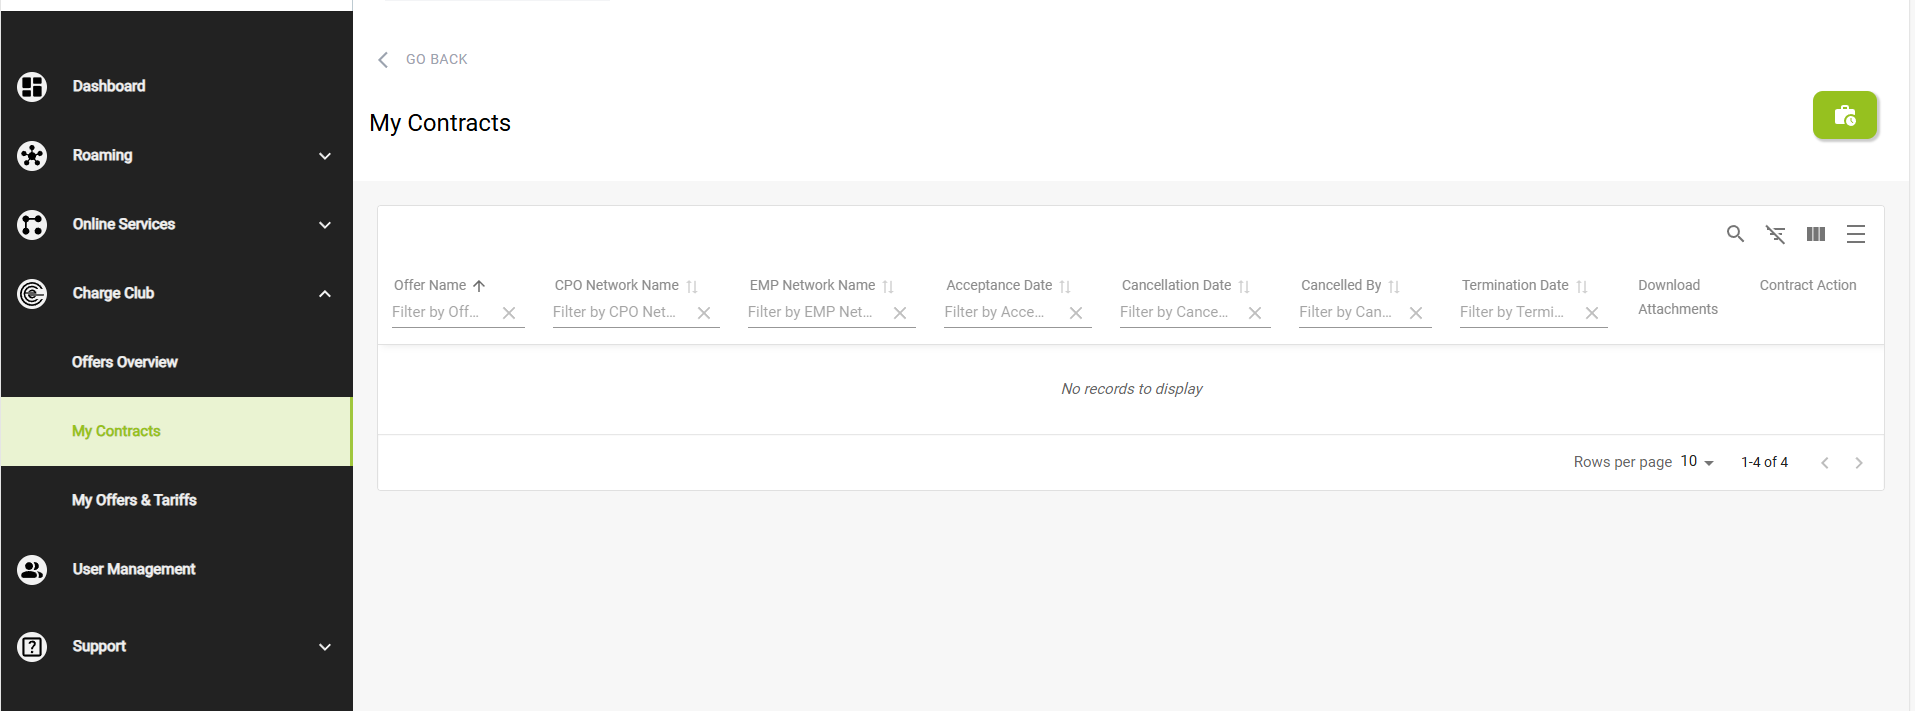
This screenshot shows the "My Contracts" section of the platform. This area displays all active or past roaming contracts between CPOs and EMPs, based on accepted offers. The table includes multiple columns such as:
- Offer Name – the name of the offer related to the contract
- CPO Network Name – the name of the Charge Point Operator network
- EMP Network Name – the name of the E-Mobility Provider network
- Acceptance Date, Cancellation Date, Terminated Date – timestamps showing the contract lifecycle
- Cancelled By – who initiated the cancellation (if any)
- Download Attachments – option to download contract documents
- Contract Action – actions like viewing or managing the contract
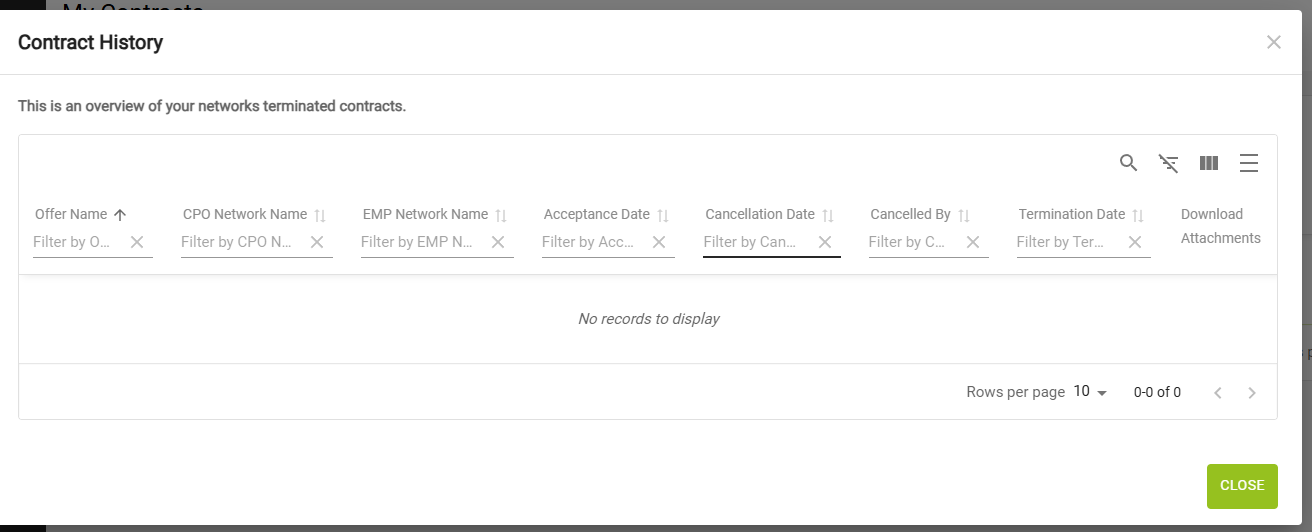
This screenshot shows the "Contract History" window, which opens when clicking the green button in the "My Contracts" section. It provides an overview of all terminated roaming contracts related to your network.
The table includes the same key contract details as in the main view:
- Offer Name – the original offer title linked to the contract
- CPO Network Name and EMP Network Name – involved parties
- Acceptance Date, Cancellation Date, Terminated Date – important contract lifecycle timestamps
- Cancelled By – indicates which party canceled the contract
- Download Attachments – allows retrieval of the contract file(s)
My Offers & Tariffs
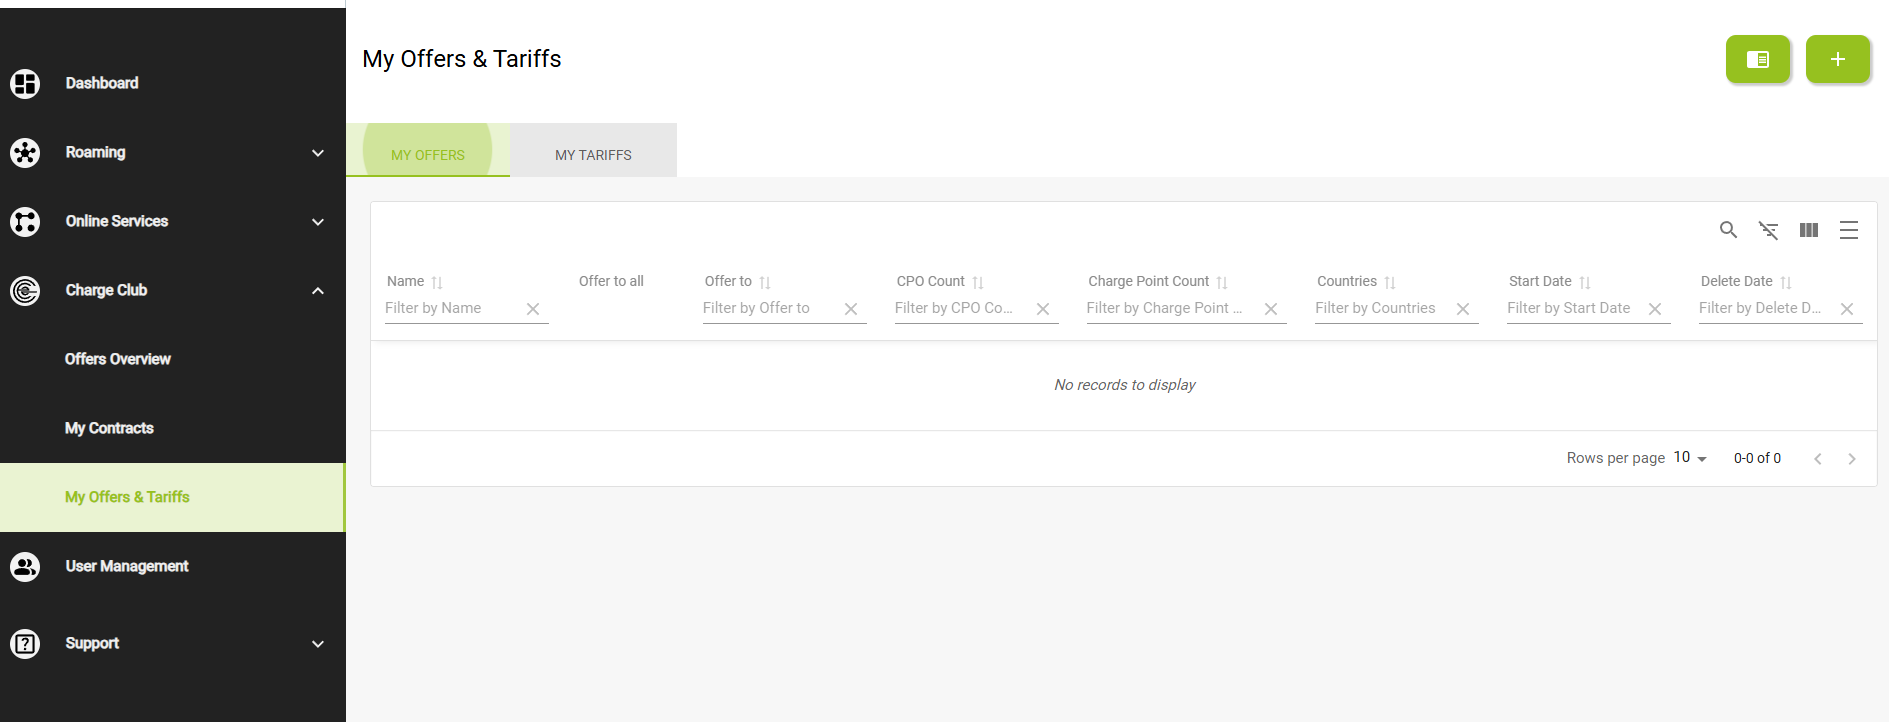
This screen shows the "My Offers" tab under the "My Offers & Tariffs" section . It displays all the roaming offers created by the selected network (here: Ladenetz). Each row represents an offer with columns such as:
- Name – the name of the offer
- Offer to all / Offer to – indicates whether the offer is public or directed to specific partners
- CPO Count and Charge Point Count – number of involved CPOs and charge points
- Countries – where the offer is available
- Start Date / Delete Date – lifecycle of the offer
Currently, the message "No records to display" means that no offers have been published by this network.
This screen shows the "My Tariffs" tab, also within the "My Offers & Tariffs" section. It lists all tariffs created by the user’s network. The table includes:
- Tariff Name – name or ID of the tariff
- Available in Offer – indicates if the tariff is linked to an active offer
- Type of Current – shows whether the tariff applies to AC, DC, etc.
- Actions – buttons to edit or delete the tariff.
- At the top of the table, there are filter fields under each column header. These filters allow users to search for specific tariffs by entering criteria (e.g., part of a name ather than just narrowing the view. Additionally, a global search bar and a filter icon (top right) provide more advanced filtering options.
Create Offers & Tariffs
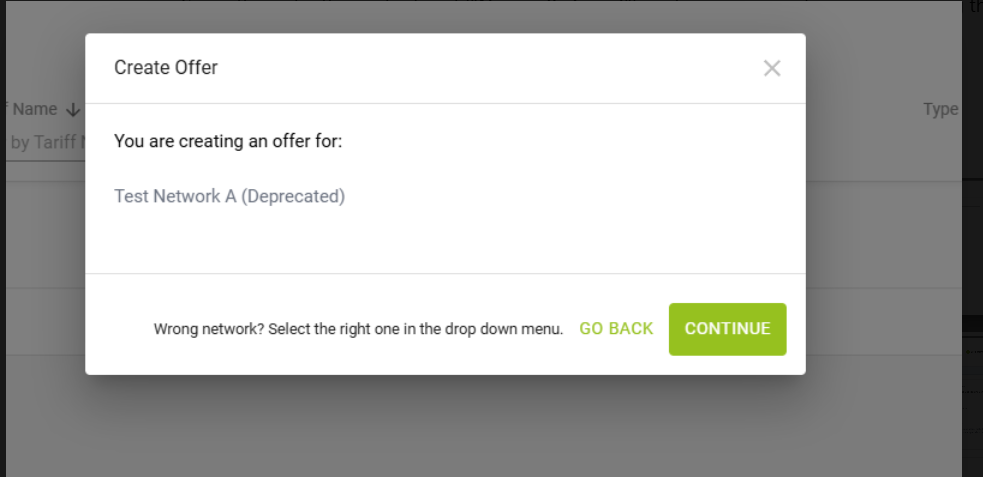
🟢 Select Network (Create Offer)
In this initial window, the user receives a confirmation indicating which network the offer will be created for (in this example: Test Network A ).
👉 A message allows the user to change the network using the dropdown menu if it's incorrect.
Available buttons:
- GO BACK to cancel
- CONTINUE to proceed to the next step
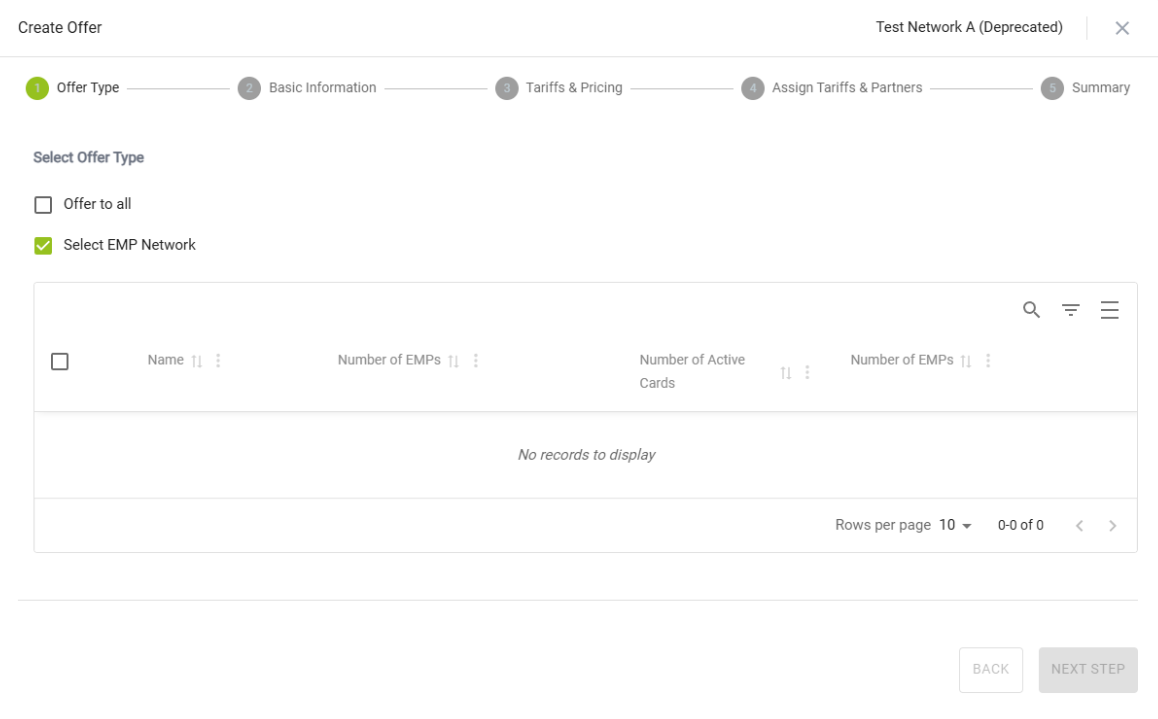
🟢 Step 1: Select Offer Type
The user must choose whether the offer will be:
- ✅ A public offer ("Offer to all"), available to all EMPs
- 🟩 Or a targeted offer by selecting the option "Select EMP Network", which allows choosing specific partner networks.
Select EMP Network
If the user checks "Select EMP Network", a list of EMP partners appears with the following columns:
- Name (EMP network name)
- Number of EMPs
- Number of Active Cards
🟢 Step 2: Basic Information
Here, the user provides the following details:
- Name of the offer
- 📎 Must accept the general terms and conditions by checking a box (Charge Club Roaming Contract)
- 📄 May upload additional terms and conditions (PDF file)
- 📅 Defines a start date for the offer using a calendar field

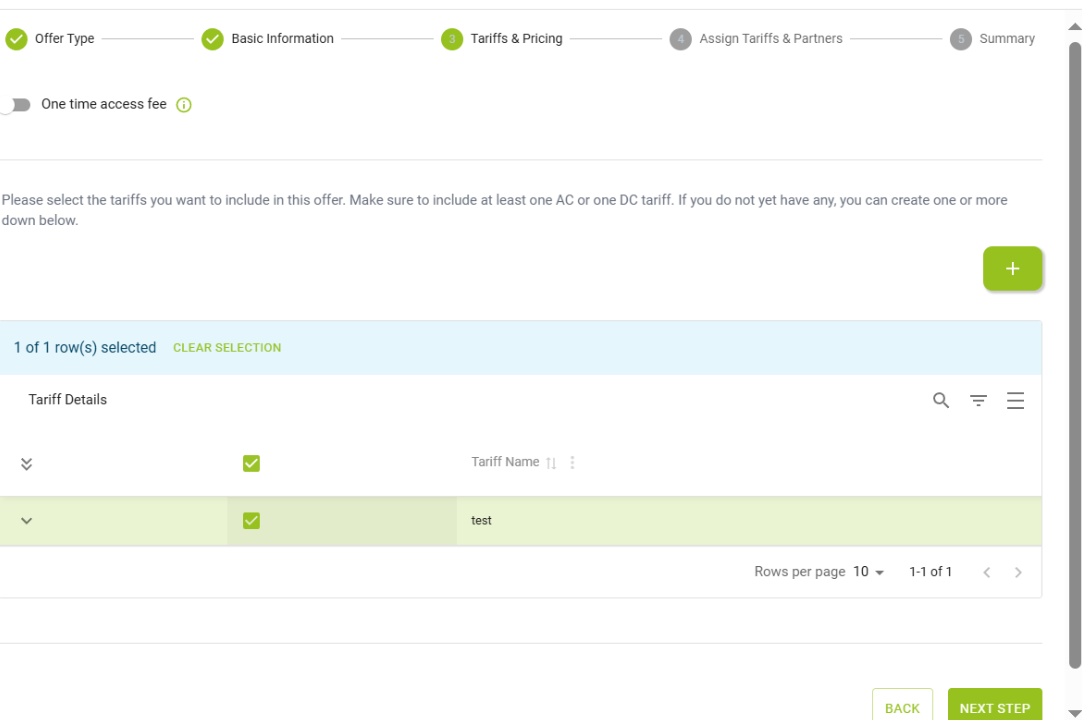
🟢 Step 3: Tariffs & Pricing
Here, the user provides the following details:
- May enable or disable a one-time access fee
- Must select at least one AC or one DC tariff
- Can select existing tariffs or create a new one if none are available
- Selected tariffs will appear in the Tariff Details table
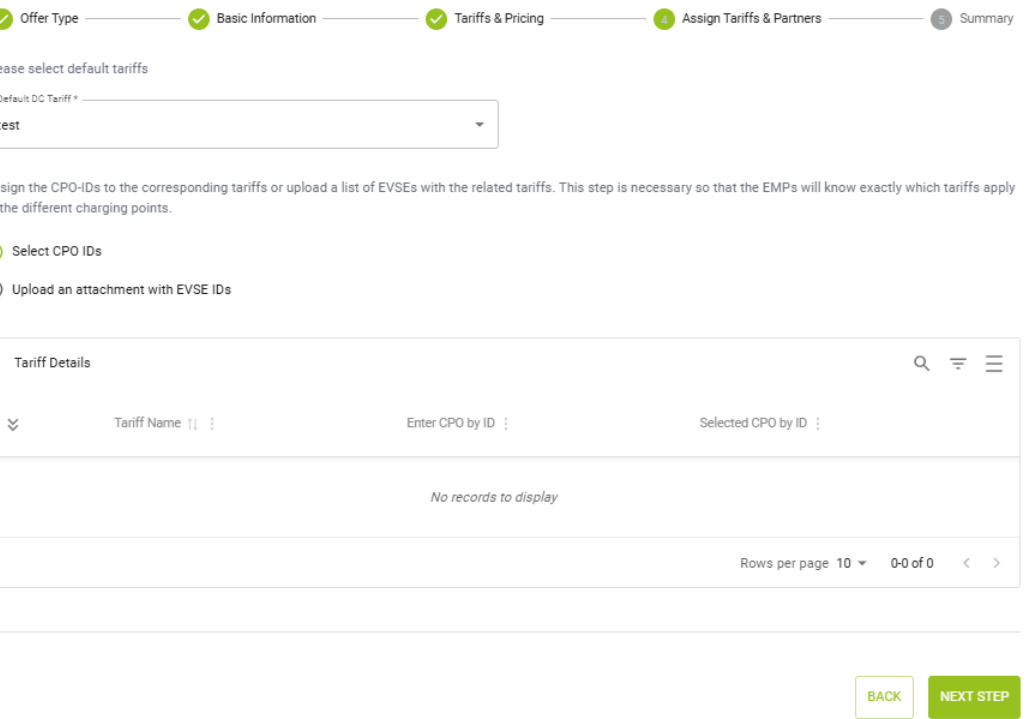
🟢 Step 4: Assign Tariffs & Partners
Here, the user assigns tariffs to specific charging points:
- Must set a default tariff from the dropdown
-
Can choose between:
📌 Select CPO IDs manually
📎 Upload an attachment with a list of EVSE IDs (PDF format) - Ensures that EMPs can see which tariffs apply at which charging stations
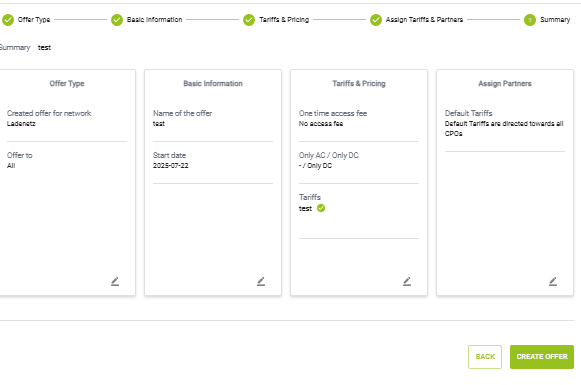
🟢 Step 5: Summary
Here, the user reviews all details before creating the offer:
- Confirms the offer type, name, and start date
- Verifies selected tariffs and access fee options
- Reviews tariff assignments to CPOs or EVSEs
- Can go back and edit any section before clicking Create Offer
USER MANAGEMENT
- An Organisation user has the following permissions:
§ ADMIN
§ Read and Edit Access: An Organisation user with Admin permission have the rights to read and edit the information for all partners in a network
§ User Management: User has the rights to onboard new users or edit the details of onboarded users
§ Roaming Management: User can create new roaming connections, send/accept roaming connection requests
§ Data Export: User can export an excel sheet of all selected networks and partners
§ ROAMING
§ Read and Edit Access: An Organisation user with Roaming permission can read the information for partners in a network
§ Roaming Management: User can create new roaming connections, send/accept roaming connection requests
§ Data Export: User can export an excel sheet of all selected networks and partners
§ MONITORING
§ Read and Edit Access: An Organisation user with Monitoring permission can only read the information for partners in a network
§ Roaming Management: User cannot send/accept roaming connection requests
§ Data Export: User can export an excel sheet of all selected networks and partners.
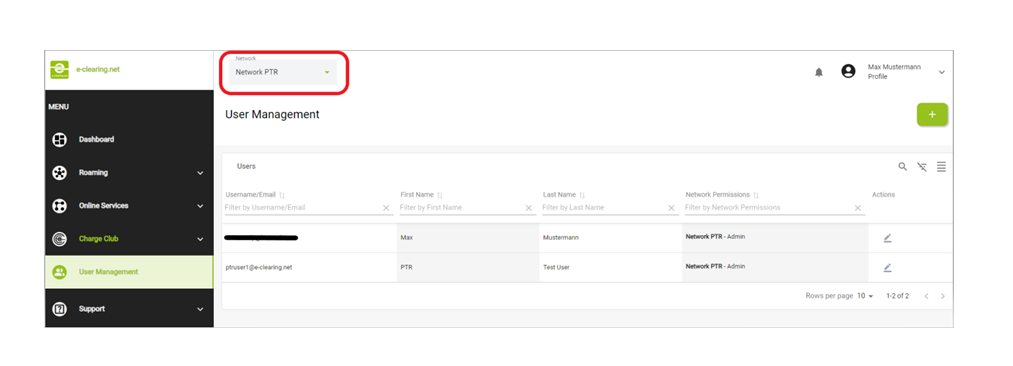
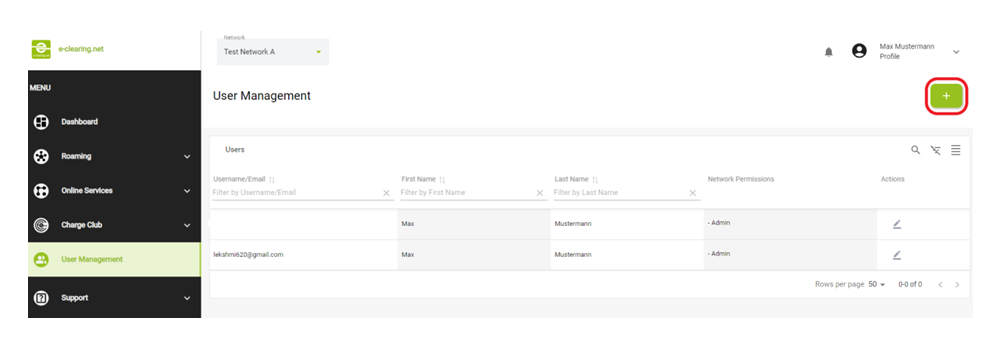
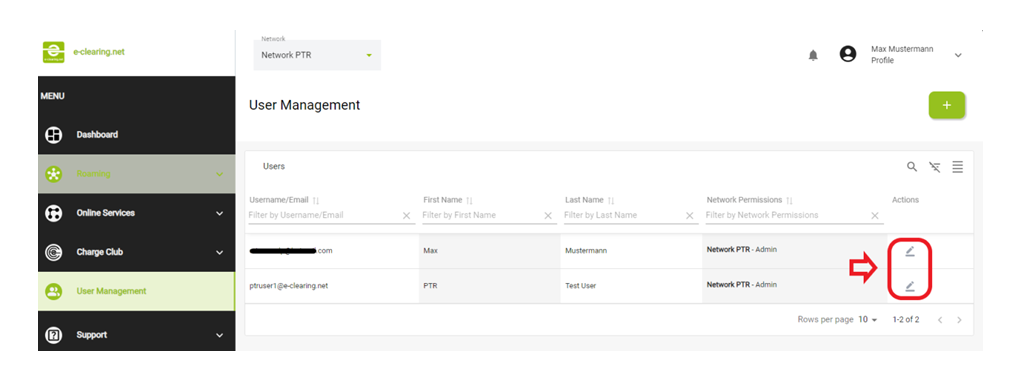
- As an Organization User with Network Admin Permission, you will be able to view all users in your networks. On selecting the Menu Item User Management, the user list in your network will be displayed. The menu Item User Management will be visible only to an organisation user with Network Admin permission.
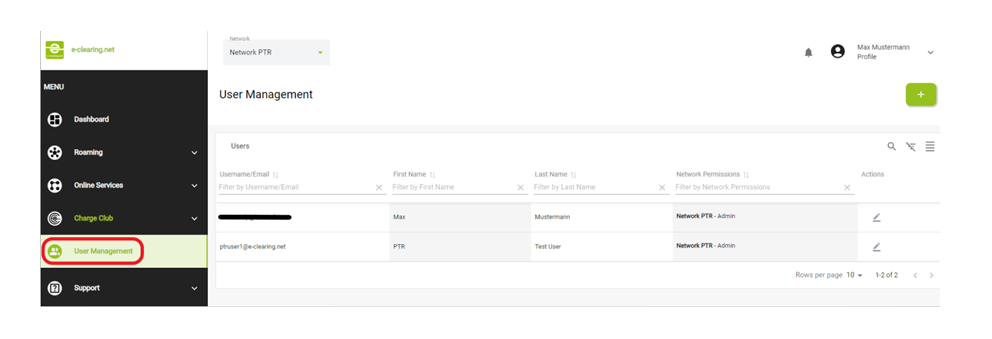
- If a user or account is assigned to different networks, they can filter the information using the network header.
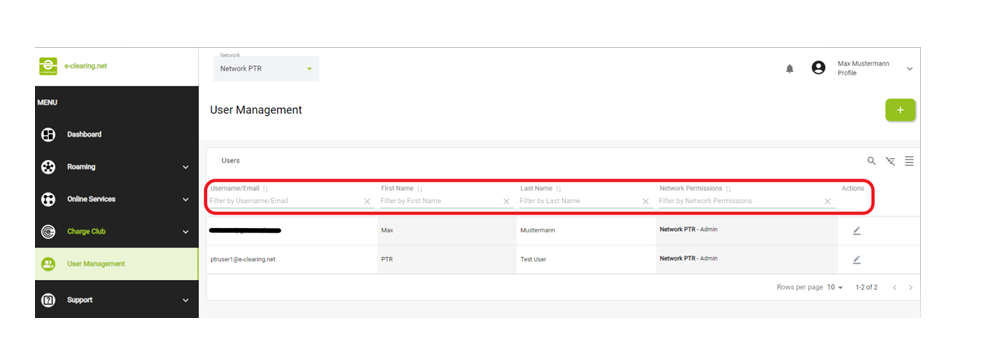
- The user list can be filtered and searched using the following:
- Username or E-Mail
- First Name
- Last Name
- Network Permissions
- The search criteria are not case sensitive.
-
The
user network in your network will be displayed as follows
- Organisation Users with Admin rights can create new users and assign roles or permissions to provide access to the eCHX system.
- Users with Network Admin permissions can create and manage users within their assigned network.
- The “Create user” functionality is accessible from the user list page.
- After clicking the create user button, you need to enter the basic information of the user including:
- First Name
- Last Name
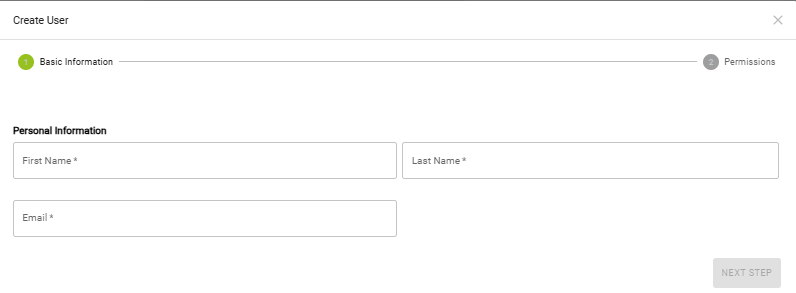
- In the next step, the permissions for the selected user are displayed.
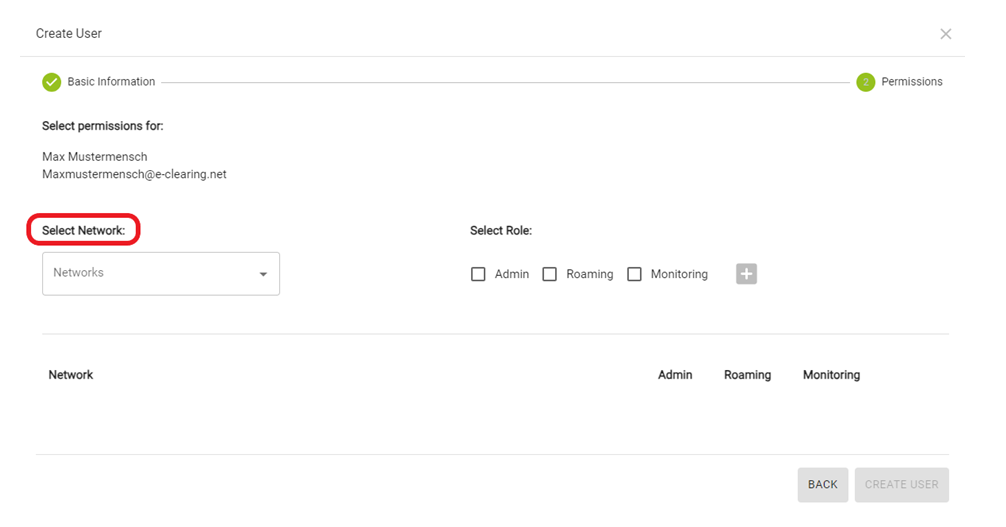
- The active user assigns a network to the network new user from the dropdown network selection.
- The functionality of the permission depends on the role assigned to the new user.
Following are the permissions for the organisation user:
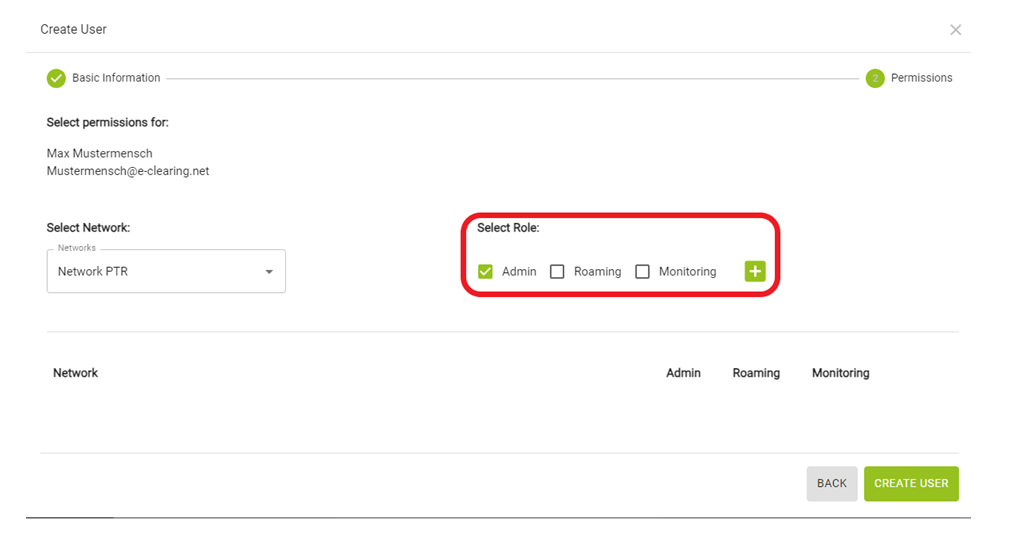
- The corresponding roles should be selected and added by clicking the add button.
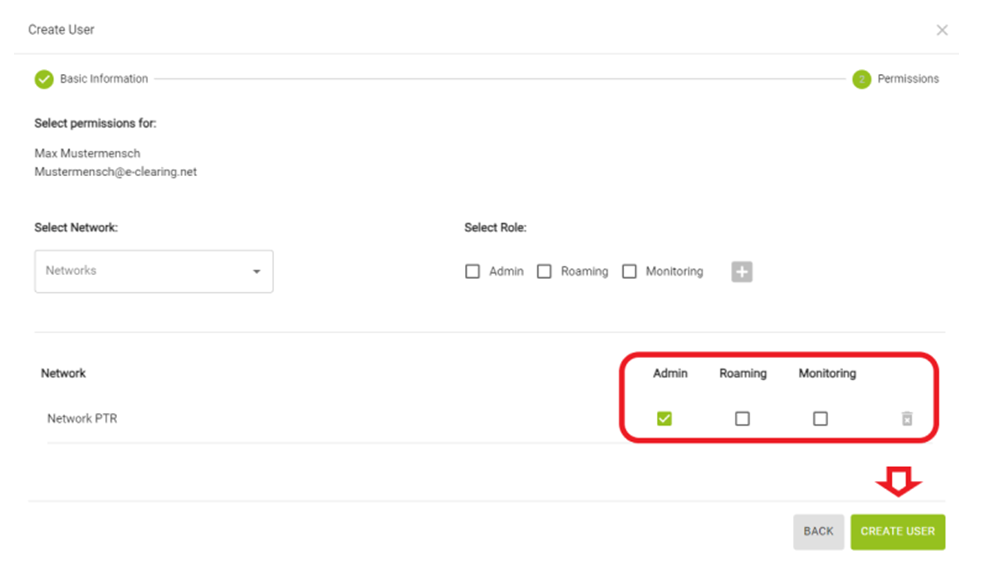
- After confirming the changes, the data is stored in the database.
- The Organisation user with Admin rights can edit the created user using the edit button.
- The basic information and the permissions assigned to the user can be edited.
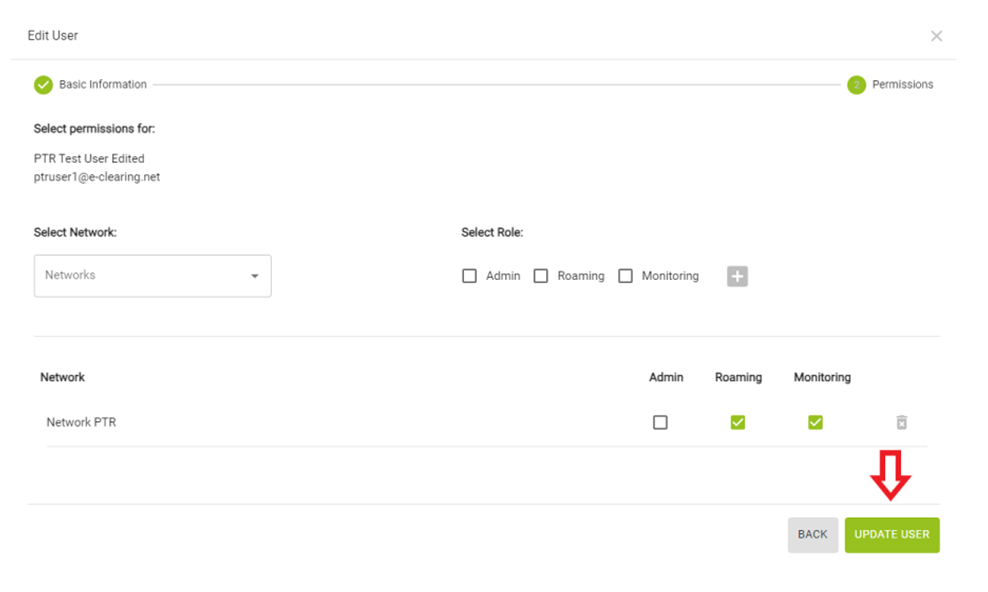
- Upon confirming, the changes are saved successfully.
Note / Best practice: Do not create Admin Accounts for shared e-mail addresses. We advise giving “Monitoring rights” instead. As a best practice, it is also recommended that when colleagues leave the company, admins ensure their accounts are properly deleted from the frontend to maintain security and accuracy.